How To Use TestNG Reporter Log In Selenium

TestNG is an open-source test automation framework, where ‘NG’ stands for Next Generation. TestNG has given testers the ability to group or prioritize the test cases, generate HTML reports, log messages, run tests in parallel, and much more. These diverse sets of features are a huge boon when it comes to Selenium automation testing.
](https://cdn-images-1.medium.com/max/2000/1*HAC4jrQZTPIJbv6S5KXlyA.gif)
In our previous blogs of this Selenium TestNG tutorial series, we have learned to use the TestNG results plugin, generate the TestNG reports in Jenkins, install the TestNG reports plugin in Jenkins, and more. But why do we need reporting structure in the first place?
Reports can be insightful as they give us all the accessible information in one place, and with automated report generation structures, they even improve the efficiency and overall analysis. However, sometimes TestNG reports might not convey to us the exact root of failure due to insufficient logging. As a result, we might need to run the whole class to ascertain the problem.
To overcome this problem, TestNG provides us an inbuilt class called the Reporter Class. In this Selenium TestNG tutorial, we will find out how to use the TestNG Reporter Log. By the end of this blog, you would be able to store log super-useful information in the reports.
Note: Random String Generator — The most simple online utility that generates random strings. Free, quick and powerful Random String Generator that allows you to flexibly create random strings ranging from minimum 8 to maximum 25 character length.
What is the Reporter Class in TestNG?
Reporter Class is an inbuilt class in TestNG which is available under the org.testng package. This class provides test methods to log messages that will be included in the HTML reports generated by TestNG. Reporter Class is one of the simplest ways of generating log information.
It helps in storing logs in the reports that can be either user-generated or system-generated reports. This can be hugely beneficial when we later look at the reports as it helps derive detailed information from the logs. This avoids the need to rerun the entire test case.
For example, if you have a test case with many steps, Reporter Class can prove to be extremely helpful since you can specify different logs at each step and later use them when debugging the failures.
Let’s see how we can use the TestNG Reporter Log in Selenium-based test automation framework.
Reporter Class Syntax
Reporter Class of TestNG provides us with four different methods to log information. Isn’t that interesting? Here are those methods:
Reporter.log(String s);
Reporter.log(String s, Boolean logToStandardOut);
Reporter.log(String s, int level);
Reporter.log(String s, int level, Boolean logToStandardOut);
Now, let’s go through each one of these TestNG Reporter Log syntaxes in detail.
1. Reporter.log(String s);
This method logs the string passed into your HTML Report.
Parameters:
S — The message to be logged
Example:
Reporter.log("Logging into Selenium Playground");
2. Reporter.log(String s, Boolean logToStandardOut);
This method logs the string passed into your HTML Report. Additionally, it also prints the same message on your console if logToStandardOut is set to TRUE.
Parameters:
S — The message to be logged logToStandardOut — Print the message on standard output
Example:
Reporter.log("Logging into Selenium Playground", true);
3. Reporter.log(String s, int level);
This method logs the string passed into your HTML Report if the current verbosity equals or is greater than the one passed in the parameter.
Parameters:
S — The message to be logged level — The verbosity of the message to be logged
Example:
Reporter.log("Logging into Selenium Playground", 2);
What is Verbosity Level in TestNG?
The Verbose Level in TestNG is used to define the amount of logging performed on the console. The verbosity level ranges from 0 to 10, where 10 is the most detailed logging level whereas 0 means minimal logging.
You can set the verbosity level in your testng.xml. Below is a sample snippet from the tesng.xml, which indicates how to do the same.
<suite thread-count="2" name="TestNGReporterTest" parallel="classes" verbose="10">
4. Reporter.log(String s, int level, Boolean logToStandardOut);
This method logs the string passed into your HTML Report if the current verbosity equals or is greater than the one passed in the parameter. Additionally, it will print the message onto the console if logToStandardOut is set to TRUE.
Parameters:
S — The message to be logged level — The verbosity of the message to be logged logToStandardOut — Whether to print the message on standard output as well
For example,
Reporter.log("Logging into Selenium Playground", 2, true);
As the demand for automation increases, so does the demand for skilled testers. TestNG helps you become an automation expert. With LambdaTest’s TestNG certification, you can begin your journey to becoming an automated testing expert.
Here’s a short glimpse of the TestNG certification offered by LambdaTest:
Note: Random Sentence Generator — Free online tool to generate random sentences effortlessly.
How to log messages in reports using TestNG Reporter Class?
Now that we have seen the basics of TestNG Reporter Log in this Selenium TestNG tutorial, let’s deep dive into how we can use the same in our Selenium Automation Framework. We would do the same by demonstrating through a TestNG Reporter Log example.
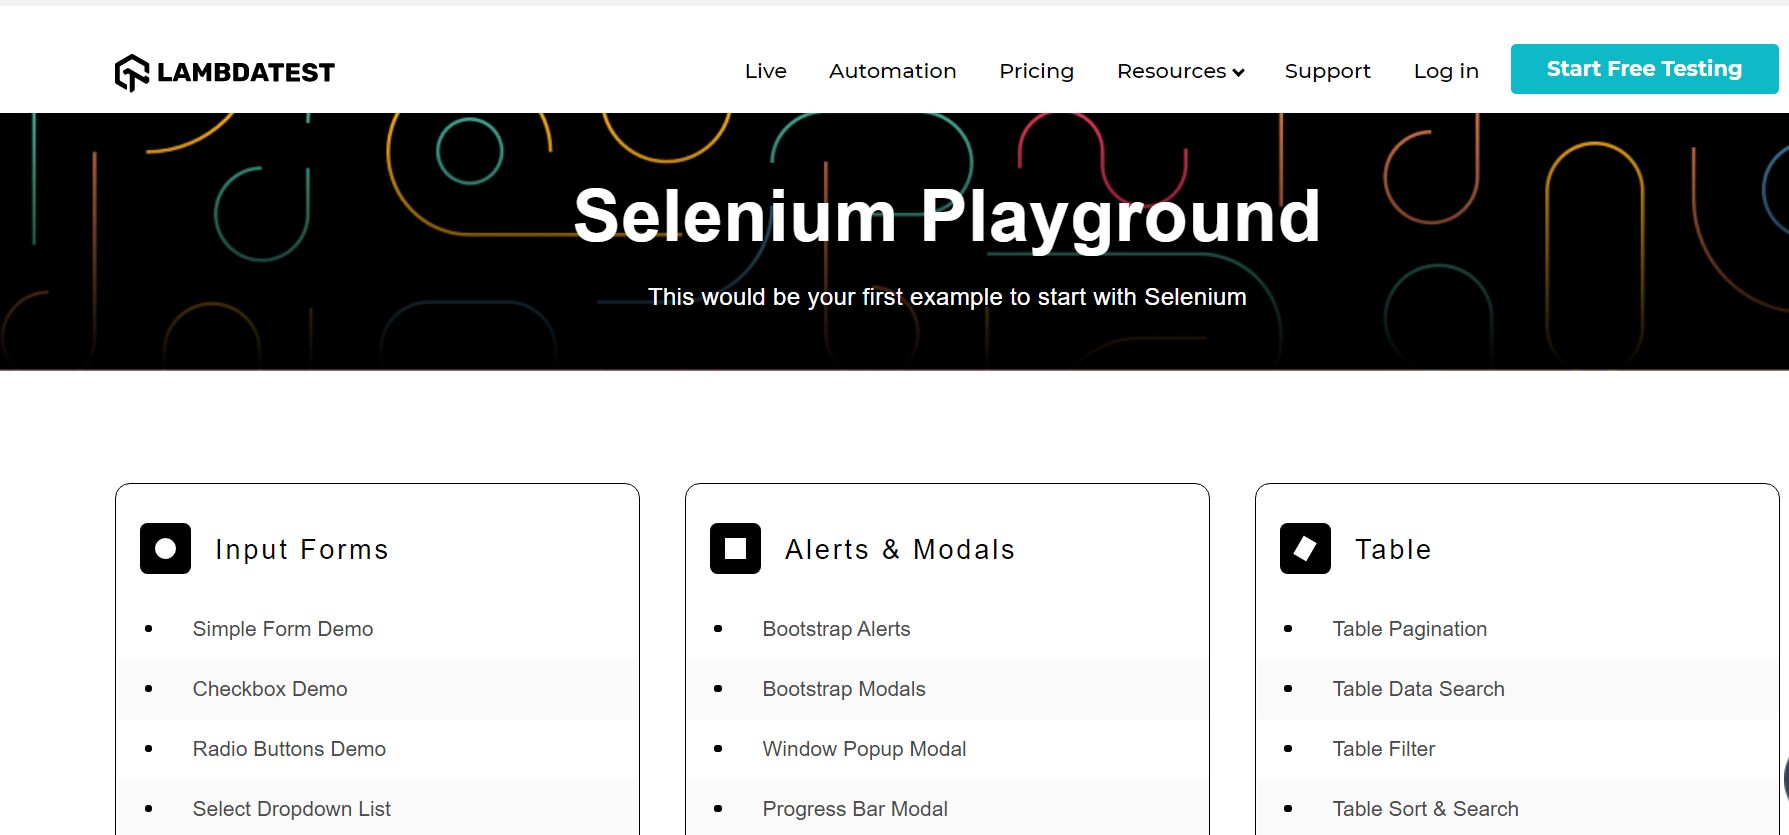
Use Case: Automate the Simple Form Demo Page of Selenium Playground using the Cloud Selenium Grid By LamdaTest.
LambdaTest provides a cloud-based cross browser testing tool that allows users with an easy way to manage their manual and automated tests across 3000+ online browsers and operating systems combinations.
We will cover the below steps in our test case and use Reporter Class to log all the necessary details.
Click on Simple Form Demo
Enter a message in Single Input Field and retrieve the Message
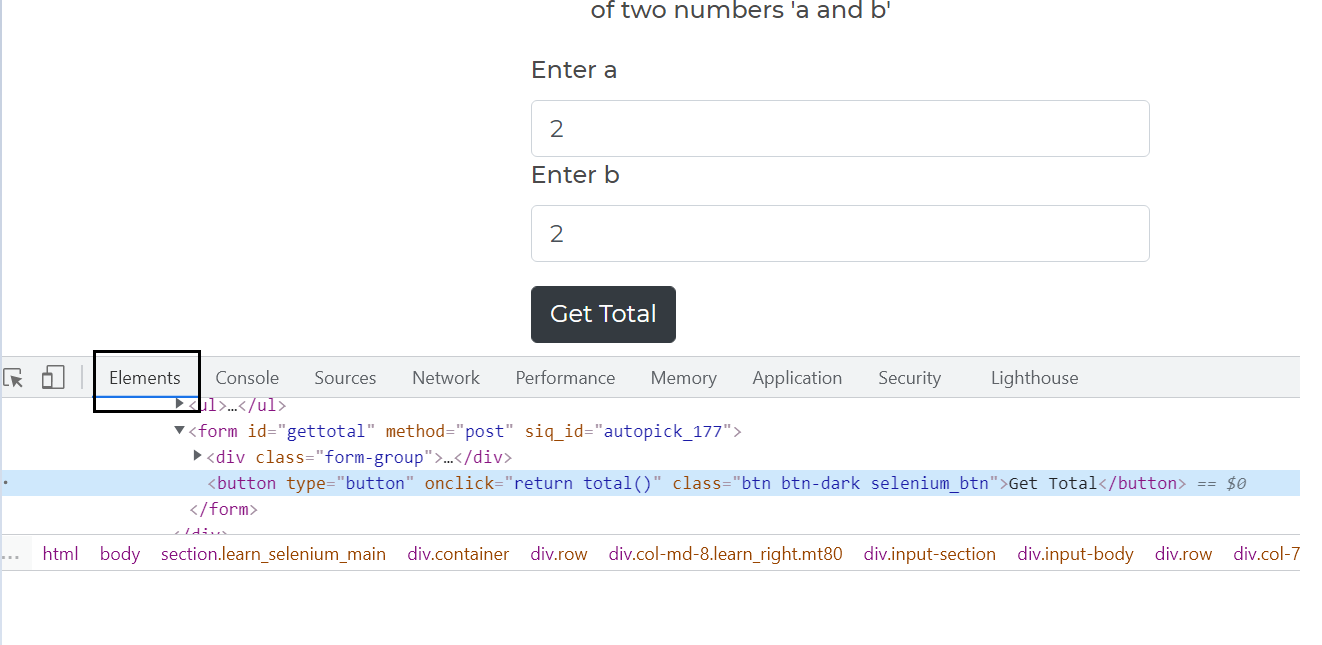
Enter a value in the Two Input Fields and retrieve the total of those total values
Validate the actual and expected values.
Below attached is the test class file, its corresponding testng.xml file, and the pom.xml, which is needed in running the same.
package LamdaTest;
import org.openqa.selenium.By;
import org.openqa.selenium.WebElement;
import org.openqa.selenium.remote.DesiredCapabilities;
import org.openqa.selenium.remote.RemoteWebDriver;
import org.testng.Assert;
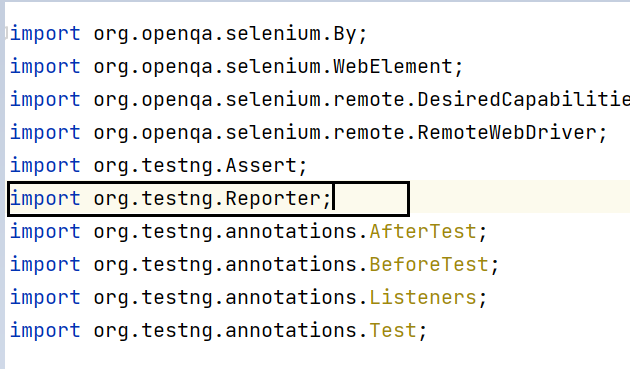
import org.testng.Reporter;
import org.testng.annotations.AfterTest;
import org.testng.annotations.BeforeTest;
import org.testng.annotations.Listeners;
import org.testng.annotations.Test;
import java.net.MalformedURLException;
import java.net.URL;
@Listeners({util.Listener.class})
class ReporterTest {
public String username = "YOUR USERNAME";
public String accesskey = "YOUR ACCESSKEY";
public static RemoteWebDriver driver = null;
public String gridURL = "@hub.lambdatest.com/wd/hub";
@BeforeTest
public void setUp() throws Exception {
DesiredCapabilities capabilities = new DesiredCapabilities();
capabilities.setCapability("browserName", "chrome");
capabilities.setCapability("version", "93.0");
capabilities.setCapability("platform", "win10"); // If this cap isn't specified, it will just get the any available one
capabilities.setCapability("build", "TestNGReporterLog");
capabilities.setCapability("name", "TestNGReporterLogSample");
try {
driver = new RemoteWebDriver(new URL("https://" + username + ":" + accesskey + gridURL), capabilities);
} catch (MalformedURLException e) {
System.out.println("Invalid grid URL");
} catch (Exception e) {
System.out.println(e.getMessage());
}
}
@Test
public void learnSingleInputFieldUsingSelenium() {
try {
Reporter.log("Logging into Selenium Playground");
driver.get("https://www.lambdatest.com/selenium-playground/");
Reporter.log("Logged into Selenium Playground. Now, Clicking On Simple Form Demo", true);
//Clicks on the simple form demo option in the selenium playground
WebElement simpleFormDemo = driver.findElement(By.xpath("//a[text()='Simple Form Demo']"));
simpleFormDemo.click();
Reporter.log("Clicked successfully on Simple Form Demo option.", 2);
//Enters the message in the enter message input box
WebElement messageInputBox = driver.findElement(By.xpath("//input[@id='user-message']"));
messageInputBox.sendKeys("Running my first testcase using Lambda Test");
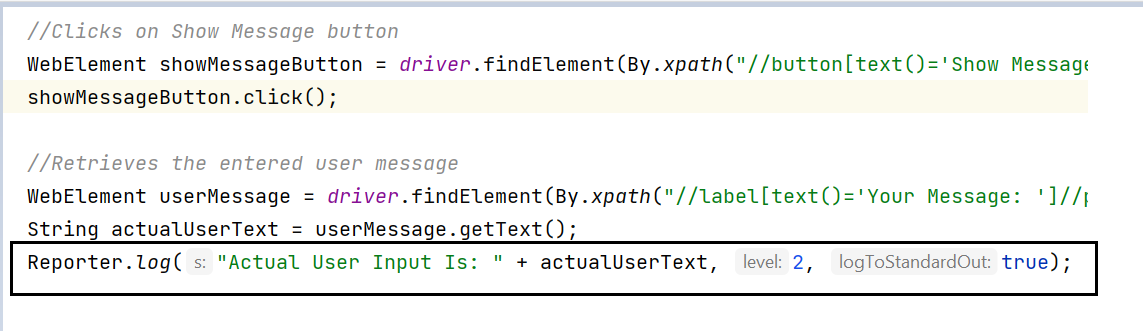
//Clicks on Show Message button
WebElement showMessageButton = driver.findElement(By.xpath("//button[text()='Show Message']"));
showMessageButton.click();
//Retrieves the entered user message
WebElement userMessage = driver.findElement(By.xpath("//label[text()='Your Message: ']//parent::div//span"));
String actualUserText = userMessage.getText();
Reporter.log("Actual User Input Is: " + actualUserText, 2, true);
Assert.assertTrue(actualUserText.equals("Running my first testcase using Lambda Test"), "Expected and actual texts do not match.");
} catch (Exception e) {
}
}
@Test
public void learnMultipleInputFieldUsingSelenium() {
try {
Reporter.log("Logging into Selenium Playground");
driver.get("https://www.lambdatest.com/selenium-playground/");
Reporter.log("Logged into Selenium Playground. Now, Clicking On Simple Form Demo", true);
WebElement simpleFormDemo = driver.findElement(By.xpath("//a[text()='Simple Form Demo']"));
simpleFormDemo.click();
Reporter.log("Clicked successfully on Simple Form Demo option For Multiple input fields.", 2);
WebElement firstInputBox = driver.findElement(By.xpath("//input[@id='sum1']"));
firstInputBox.sendKeys("2");
WebElement secondInputBox = driver.findElement(By.xpath("//input[@id='sum2']"));
secondInputBox.sendKeys("2");
WebElement getTotalButton = driver.findElement(By.xpath("//button[text()='Get Total']"));
getTotalButton.click();
WebElement userMessage = driver.findElement(By.xpath("//label[text()='Total a + b = ']//parent::div//span"));
String actualUserText = userMessage.getText();
Reporter.log("The total of the two entered user inputs is: " + actualUserText, 2, true);
Assert.assertTrue(actualUserText.equals("4"), "Expected and actual texts do not match.");
} catch (Exception e) {
}
}
@AfterTest
public void closeBrowser() {
driver.close();
Reporter.log("The driver has been closed.", false);
}
}
GitHub source: https://gist.github.com/RDayal11/1440f06481e4fda2290da2c30d836b91
You can make use of the below testng.xml to run the above java class. Here, we are running the tests in parallel with 2 threads and a verbosity level of 10. You can right-click on the testng.xml file and choose the Run as TestNG option to run the same.
<?xml version="1.0" encoding="UTF-8"?>
<!DOCTYPE suite SYSTEM "http://testng.org/testng-1.0.dtd">
<suite thread-count="2" name="TestNGReporterTest" parallel="classes" verbose="10">

   <test name="TestNGReporterTest" preserve-order="true">
       <classes>
           <class name="LamdaTest.ReporterTest">
               <methods>
                   <include name="learnMultipleInputFieldUsingSelenium"/>
                   <include name="learnSingleInputFieldUsingSelenium"/>
               </methods>
           </class>
       </classes>
   </test>
</suite>
Below pom.xml will be needed for installing all the necessary dependencies.
<?xml version="1.0" encoding="UTF-8"?>
<project xmlns="http://maven.apache.org/POM/4.0.0"
        xmlns:xsi="http://www.w3.org/2001/XMLSchema-instance"
        xsi:schemaLocation="http://maven.apache.org/POM/4.0.0 http://maven.apache.org/xsd/maven-4.0.0.xsd">
   <modelVersion>4.0.0</modelVersion>

   <groupId>org.example</groupId>
   <artifactId>LambdaTest</artifactId>
   <version>1.0-SNAPSHOT</version>
   <dependencies>
       <dependency>
           <groupId>org.seleniumhq.selenium</groupId>
           <artifactId>selenium-api</artifactId>
           <version>4.0.0-alpha-7</version>
       </dependency>
       <dependency>
           <groupId>org.testng</groupId>
           <artifactId>testng</artifactId>
           <version>6.14.3</version>
       </dependency>
       <dependency>
           <groupId>org.seleniumhq.selenium</groupId>
           <artifactId>selenium-remote-driver</artifactId>
           <version>4.0.0-alpha-7</version>
       </dependency>
   </dependencies>

   <properties>
       <maven.compiler.source>8</maven.compiler.source>
       <maven.compiler.target>8</maven.compiler.target>
   </properties>

</project>
Code Walkthrough
Now, let’s try to understand the test case using the TestNG Reporter Log, which we automated.
- Imported Dependencies: Here, we have imported all the necessary classes, including the Reporter Class needed for using Reporter.log methods.
2. Global Variables: As we have used an online Selenium Grid like LamdaTest to perform parallel testing, we are using the below-shown variables.
Here, you can populate the values for your corresponding username and access key, which can be collected by logging into your LamdaTest Profile Section. You can copy the Username and the Access Token to be used in the code. However, the gridURL will remain the same, as shown below.

3. @ BeforeTest(Setup Method): Here, we have made use of the LamdaTest Desired Capabilities Generator and have set the necessary capabilities of browser name, version, platform, etc., for our Selenium Remote Web Driver. Do refer to our detailed blog that deep dives into the important TestNG annotations that are used for web automation testing.
4. @ Test(learnSingleInputFieldUsingSelenium): Here, the first Reporter.log statement would print our log only on the emailable report since we haven’t used the logToStandardOut flag. However, the following would print the log both on console output and the emailable report since the logToStandardOut is set to True. Finally, the driver.get statement would open the Selenium Playground website in the Chrome browser launched in the setup method.

Once logged into Selenium Playground, the following steps get the SimpleFormDemo web element and click on the same. The Reporter.log statement used here will log the statement in the emailable report as the current verbosity level, which is 10, set through testng.xml, is greater than the value 2 sent here.

Here, we have made use of XPath in our test case for all the web elements. You can get the XPath of any element by simply doing a right-click on the Element→ Inspect Option. You can also refer to the complete guide on XPath in Selenium for understanding how you can make the most out of XPath for accessing WebElements in the DOM.
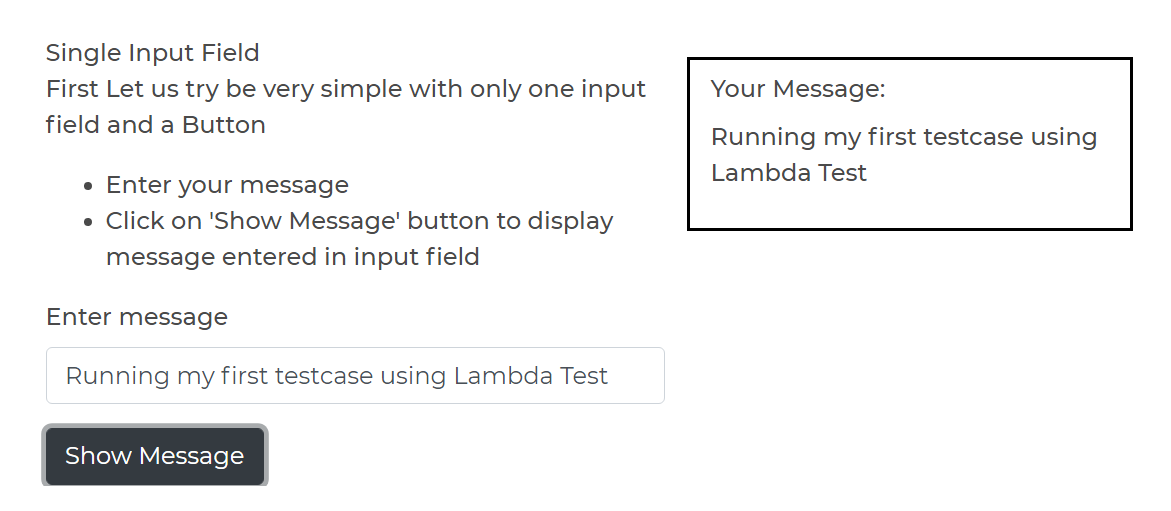
Once we are on the Simple Form Demo page, the following steps get the Message Input Box web element and enter the message “Running my first test case using Lambda Test”. Next, we click on the “Show Message” button and retrieve the message displayed, followed by an assert which validates if the entered message and displayed message are equal or not.
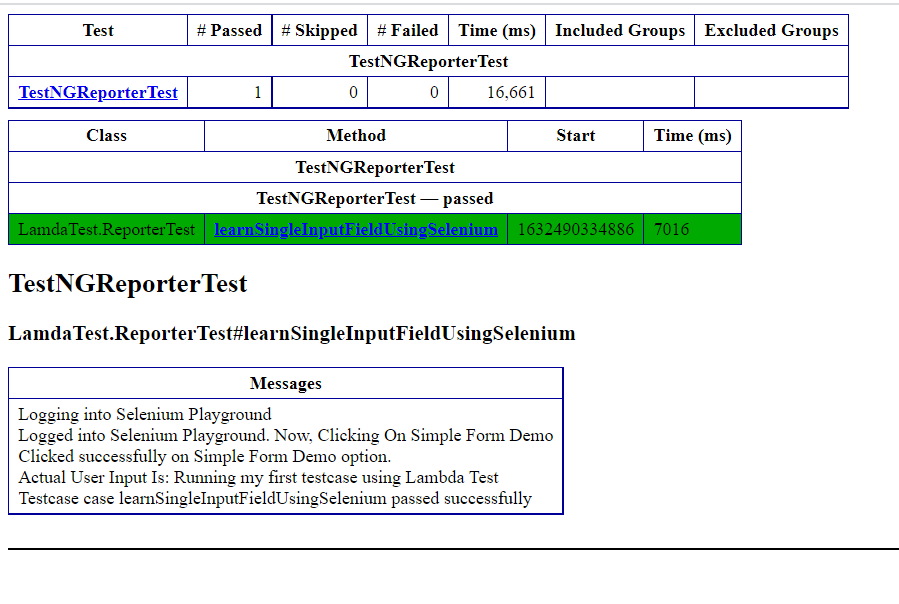
The Reporter.log statement here will log the report’s message and print the same on the console output. Thus, the final console output will look something like this:
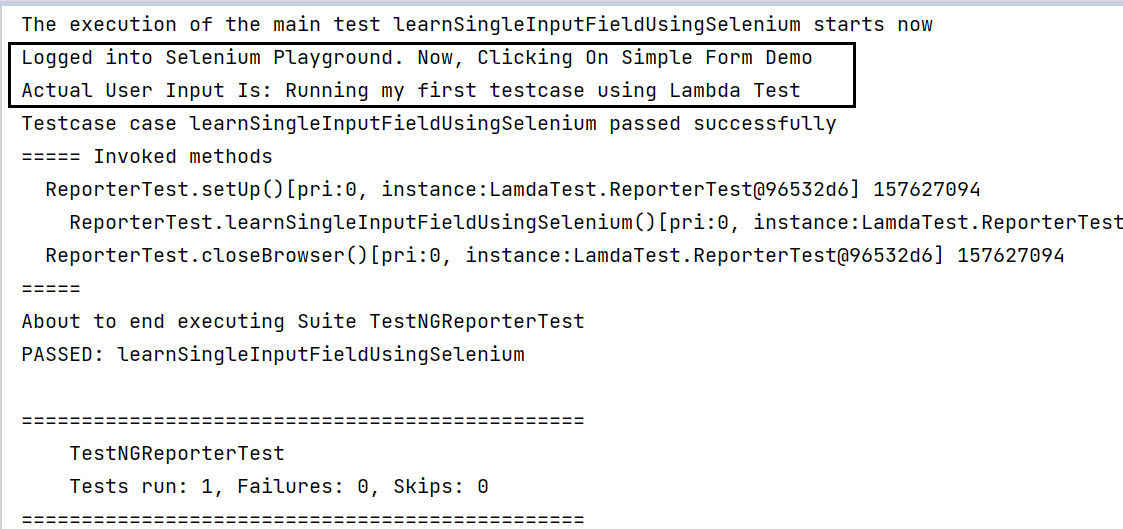
This is because the emailable report, as mentioned, contains all the messages we logged.
This is how our actual output on the playground looks:
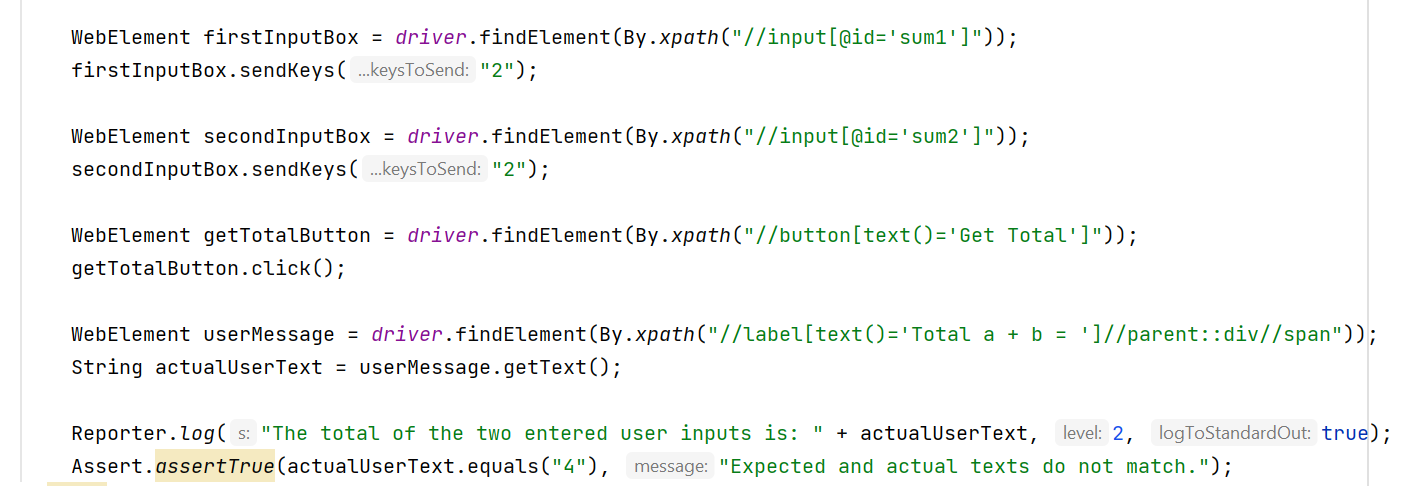
5. @ Test(learnMultipleInputFieldUsingSelenium): Here, the steps to click on the Simple Form Demo Option remain the same as our first test case. However, in this test case, instead of using the single input field, we first enter “2” in the first input box and then repeat the same for the second input box. Later, we click on the “Get Total” button and validate the values we entered.
The final console output looks something like this.
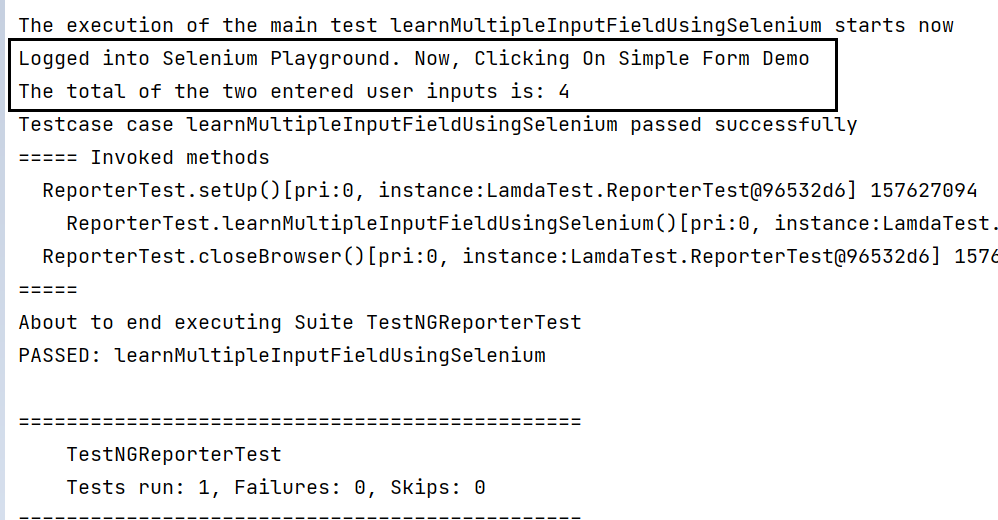
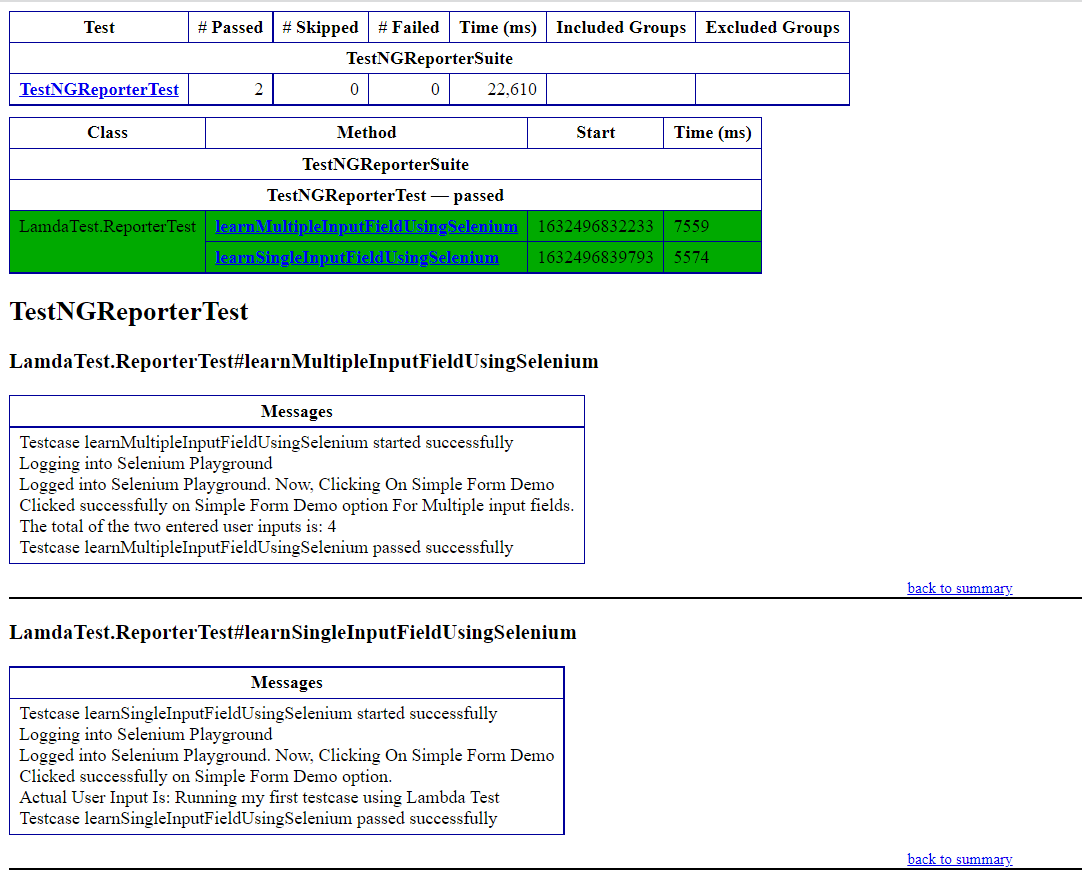
The emailable report will look like this:

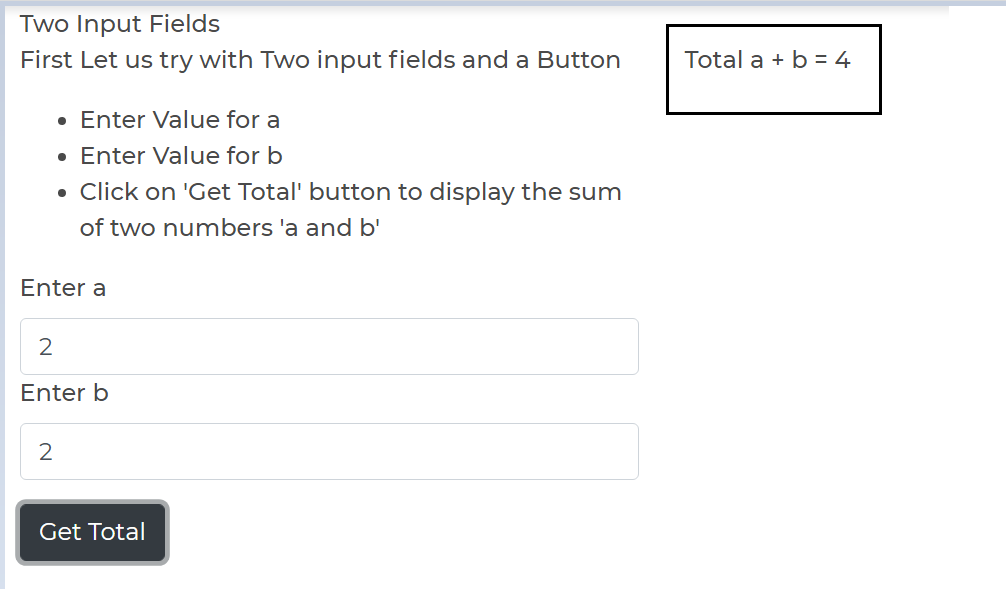
The actual output on the playground will look like this:
Note: Random UUID Generator — This free online UUID v4 generator (random UUID) creates version-4 universally unique identifiers according to RFC 4122. Version-4 UUIDs are random and dynamically generated.
How to log messages in the Report using ITestListener?
In this Selenium TestNG tutorial, we saw how we could use the Reporter.log() method in our test cases and log the desired messages in the Report (as well as the console). However, what if we want to print any log before the test execution starts or after the test execution has ended.
TestNG provides us with a lot of Listeners (e.g. IAnnotationTransformer, IReporter, etc). These interfaces are used while performing Selenium automation testing mainly to generate logs and customize the TestNG reports. Here we will make use of ITestListener. You can use the below Listener.java, which is implementing the ITestListener.
package util;
import org.testng.*;
public class Listener implements ITestListener {
// This belongs to ITestListener and will execute before the whole Test starts
@Override
public void onStart(ITestContext arg0) {
Reporter.log("About to begin executing Class " + arg0.getName(), true);
}
// This belongs to ITestListener and will execute, once the whole Test is finished
@Override
public void onFinish(ITestContext arg0) {
Reporter.log("About to end executing Class " + arg0.getName(), true);
}
// This belongs to ITestListener and will execute before each test method
@Override
public void onTestStart(ITestResult arg0) {
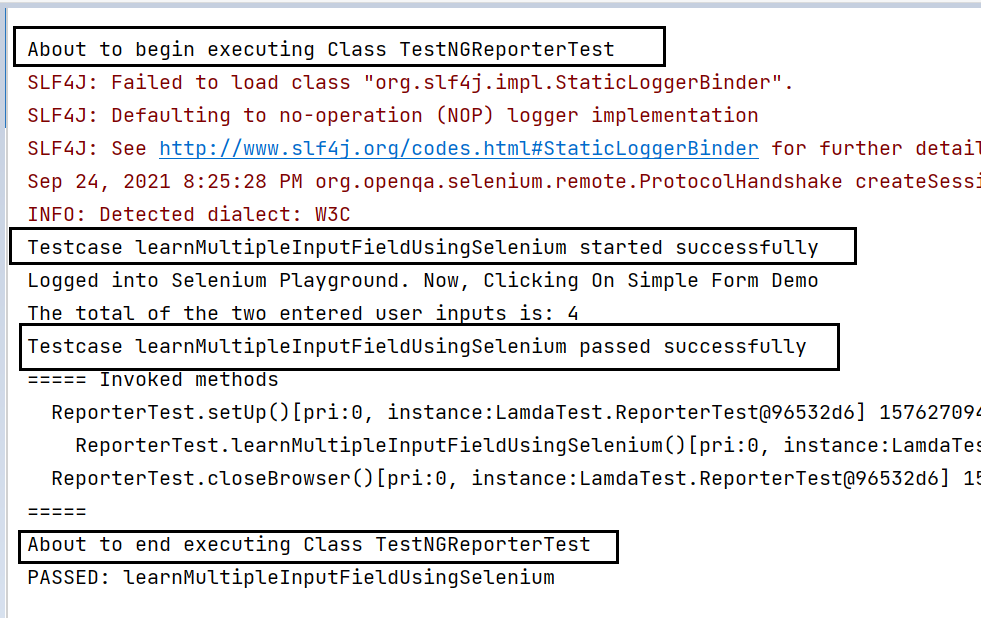
Reporter.log("Testcase " + arg0.getName() + " started successfully", true);
}
// This belongs to ITestListener and will execute only in the event of a successful test method
public void onTestSuccess(ITestResult arg0) {
Reporter.log("Testcase " + arg0.getName() + " passed successfully", true);
}
// This belongs to ITestListener and will execute only in the event of a fail test
public void onTestFailure(ITestResult arg0) {
Reporter.log("Testcase " + arg0.getName() + " failed", true);
}
// This belongs to ITestListener and will execute only in the event of the skipped test method
public void onTestSkipped(ITestResult arg0) {
Reporter.log("Testcase " + arg0.getName() + " got skipped", true);
}
@Override
public void onTestFailedButWithinSuccessPercentage(ITestResult arg0) {
}
}
GitHub source: https://gist.github.com/RDayal11/1440f06481e4fda2290da2c30d836b91
onStart: Here, Reporter.log will log the message before the execution of the whole class starts.
OnFinish: Here, Reporter.log will log the message once the execution of the whole class has finished.
onTestStart: Here, Reporter.log will log the message before the execution of the individual test methods starts.
onTestSuccess: Here, Reporter.log will log the message only if the execution of the test method has been completed with Success State.
onTestFailure: Here, Reporter.log will log the message only if the execution of the test method has been completed with Failed State.
onTestSkipped: Here, Reporter.log will log the message only if the execution of the test method has been skipped.
In the case of ITestListener, you can choose to implement only those methods which you intend to.
How to use this Listener Class in the test class?
To implement the above-described methods, you can simply add an annotation in your test class just above your class name.
Syntax:
@Listeners(PackageName.ClassName.class)

Console Output:
How to view the logged messages in EmailableReport in TestNG?
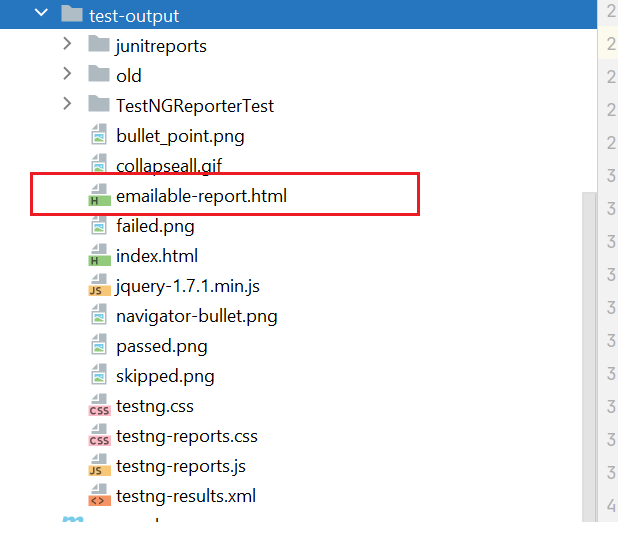
Once you have run your test case, refresh your project and go to the test-output folder. You will find an emailable-report.html inside it, which can be viewed using any browser. In addition, the emailable-report.html will have all your messages logged.
Once you open the report, it will look as shown below.
Conclusion
In this Selenium TestNG tutorial, we learned what is Reporter Class in TestNG and how we can use the different parameters it offers. We also ran our first test script using the Reporter class on Cloud Selenium Grid offered by LamdaTest and logged a few messages. We also learned how we could make use of the Reporter Class in ITestListeners. We got the logs printed on the console and finally saw them getting logged in our EmailableReport. I hope you enjoyed reading this article and learned some more about the TestNG Reporter Log.
Happy Testing!!


![FindElement And FindElements In Selenium [Differences]](/_next/image?url=https%3A%2F%2Fcdn.hashnode.com%2Fres%2Fhashnode%2Fimage%2Fupload%2Fv1649337848892%2FHnpgHrasW.jpg&w=3840&q=75)
