How To Handle Captcha In Selenium

With the rapidly evolving technology due to its ever-increasing demand in today’s world, Digital Security has become a major concern for the Software Industry. There are various ways through which Digital Security can be achieved, Captcha being one of them. Captcha is easy for humans to solve but hard for “bots” and other malicious software to figure out. However, Captcha has always been tricky for the testers to automate, as many of them don’t know how to handle captcha in Selenium or using any other test automation framework.
](https://cdn-images-1.medium.com/max/2000/1*5oLueSYnnLRxLPYzxxzMuA.png)
Now, let’s see what Captcha is and how to automate Captcha in Selenium WebDriver. We will also read in detail about ReCAPTCHA, which is hosted by Google and protects your site from spam and abuse. It uses advanced risk analysis techniques to tell humans and bots apart.
Let’s deep dive into the world of Captcha and reCAPTCHA and see how to handle image Captcha in Selenium WebDriver.
What is Captcha?
CAPTCHA stands for Completely Automated Public Turing Test To Tell Computers And Humans Apart and is a type of challenge-response test used to ascertain whether the user is a human or a bot. The primary purpose of Captcha is to prevent bots or automated programs from using various types of computing services or collecting certain types of sensitive information such as email addresses, phone numbers, etc.
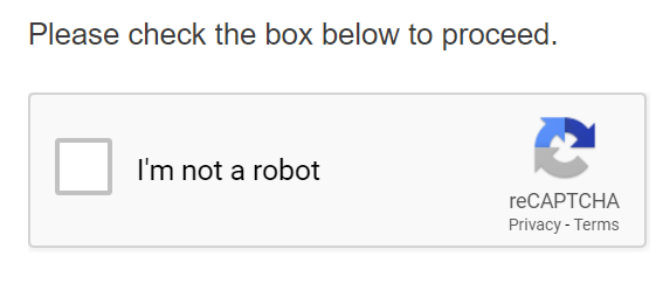
The image shown here is one generated by reCAPTCHA. Captchas are mostly dynamic and are intended to defeat automation frameworks like Selenium. However, since they are dynamic, they can be carried out successfully only with human interpretation and analysis, and as a result, most of the automated bots fail.
Different test cases possible around Captcha
Before we jump into handling Captcha scenarios in Selenium, let us first see the different test cases that are possible around Captcha. They are:
To verify that the application accepts only valid Captcha.
To verify that the Captcha code is case-sensitive.
To verify that an error message is displayed if a user enters an incorrect Captcha code.
To verify that the Captcha code on the screen is properly visible to the user or not.
To verify that a new Captcha is getting generated on page refresh.
To verify that a new Captcha is generated if a user enters an incorrect Captcha code.
To verify that Copy & Paste action doesn’t work on the Captcha input box.
To verify that the application is not accepting partial Captcha code.
Different ways to handle Captcha in Selenium
Although automating Captchas in Selenium is not the best practice, automation engineers have still been trying to find ways to automate Captcha in Selenium for a very long time to achieve complete automation of their web pages.
However, Captcha forms vary a lot. For example, they can be visual or drag and drop, etc. Some Captchas even use audio to support visually challenged individuals. This diverse form of Captchas makes it challenging to automate.
Now that we have seen the possible test cases around Captchas, how do we efficiently handle Captcha in Selenium so that the tests run seamlessly without any hindrances? As of writing this article, the latest version of Selenium is Selenium 4. This Selenium WebDriver Tutorial for beginners and professionals will help you learn what’s new in Selenium 4 (Features and Improvements).
You can follow the LambdaTest YouTube Channel and stay updated with the latest tutorials around Selenium testing, Cypress testing, CI/CD, and more.
There are three ways by which we can efficiently handle Captcha in Selenium:
By disabling Captchas in test environments
By clicking the reCAPTCHA checkbox in Selenium
By adding a delay in your selenium script and manually solving Captcha while running.
Let’s understand these in a detailed manner.
How to disable Captchas in Test Environment?
The easiest and most foolproof way to handle captchas in Selenium is to disable the need for captchas during your test. By disabling captchas in test environments, you would no longer need to perform the Captcha task while testing a web application.
The disadvantage of this approach is that you are testing something different from your production environment. Ideally, you want your automated tests to test your product in an environment that resembles your production environment.
Disabling Captchas has now become very easy with Google’s open-source captcha widget called reCaptcha.
What is reCAPTCHA?
reCAPTCHA is a CAPTCHA system that enables web hosts to distinguish between human and automated access to websites. reCAPTCHA is a free service from Google and is very widely used nowadays since it supports major screen readers such as JAWS and NVDA for IE, Edge, or Chrome on Windows OS, ChromeVox for Chrome OS, and VoiceOver for Safari and Chrome on Mac OS.
reCAPTCHA v2
In case you are using reCAPTCHA v2, you can put the Site Key and Secret Key also known as the test keys. These keys help in bypassing the CAPTCHA verification request and as a result, your automation case can run seamlessly.
Below are the test keys for the same
Site Key: 6LeIxAcTAAAAAJcZVRqyHh71UMIEGNQ_MXjiZKhI
Secret Key: 6LeIxAcTAAAAAGG-vFI1TnRWxMZNFuojJ4WifJWe
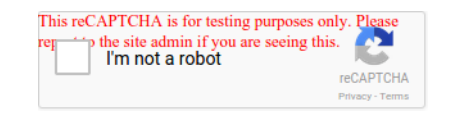
Once you enable the site keys you will see a warning message as shown below. This indicates that the CAPTCHA has been bypassed only for testing purposes and not in real-time.
reCAPTCHA v3
In the case of reCAPTCHA v3, the user needs to create their own keys for testing environments. Unlike reCAPTCHA v2, where the same keys are used for multiple environments, reCAPTCHA v3 enables the users to create separate keys for separate testing environments.
It is recommended to safeguard your code and credentials so that the test credentials can never be used in production mode. This must be done in order to avoid the risk of contaminating reCAPTCHA risk analysis with the data from the test environment, which can alter the test result analysis.
You can create your reCAPTCHA v3 keys from the Google reCAPTCHA website.
How to automate Captcha in Selenium WebDriver?
CAPTCHAs can be automated if you are able to decode the image using OCR (Optical Character Recognition). However, to do that, you’ll need to write complex algorithms to sort out the image pattern — and writing an algorithm is not that easy. Moreover, one has to be an expert in image pattern mapping as well.
But images, with time, have become progressively more unreadable, thereby reducing the chances of CAPTCHA automation.
That leaves us with one way to bypass the CAPTCHA, but it won’t automate it. In that case, we can tweak the script to wait for a certain interval of time at the screen where CAPTCHA is present, and the user will enter the CAPTCHA text himself, while other fields will be filled automatically.
Using this, we can achieve the target of complete web automation to a certain degree. But, this would still be a semi-automated test. In other scenarios, where we just have a reCAPTCHA checkbox, we can simply click it using Selenium.
Now we have seen how to automate Captcha in Selenium WebDriver. In the next section of this article on how to handle Captcha in Selenium, let us see both of these scenarios in our automation test.
Note: org.junit.TestCouldNotBeSkippedException — This represent that a test should be skipped is not skipped. Generally, it happens when the test uses method in Assume class that it should be skipped though it is completed before processing, test got completed or other failures occurred to skip the test.
By clicking the reCAPTCHA checkbox in Selenium
In case your application uses the reCAPTCHA checkbox, you will want to click the Captcha to complete the script. One of the mechanisms that reCaptcha uses is checking how long it took for the captcha to complete.
Humans will take a bit longer to complete a captcha task as compared to robots. Therefore, before clicking the Captcha, you will want to add a delay (for example using WebDriverWait) to replicate human behavior.
If you are wondering what is WebDriverWait in Selenium, let me share some insights on it. WebDriver equips the user with two kinds of waits in order to handle the recurring page loads, web element loads, the appearance of pop-ups and error messages, etc. on the web page. They are:
Implicit Wait
Explicit Wait
WebDriverWait falls under the category of Explicit Waits. Explicit Waits are used to halt the execution until the time a particular condition is met or the maximum time has elapsed. You will be able to understand it better once we use it in our implementation.
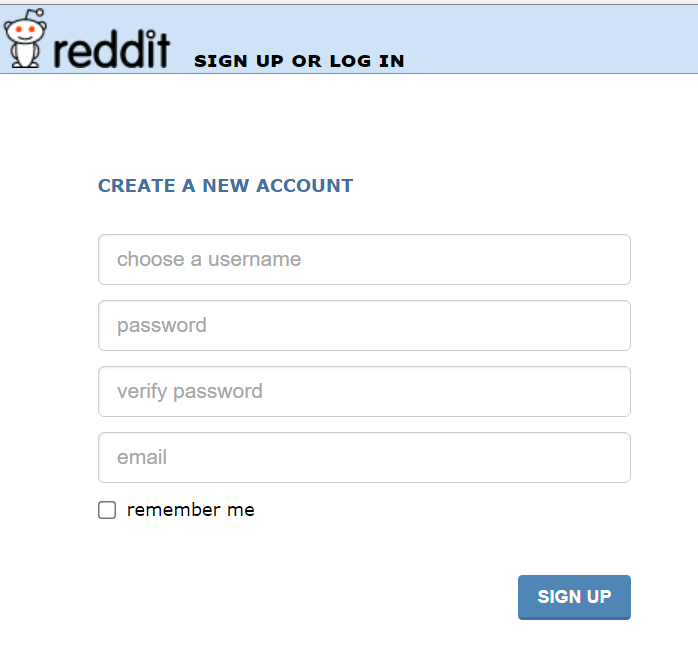
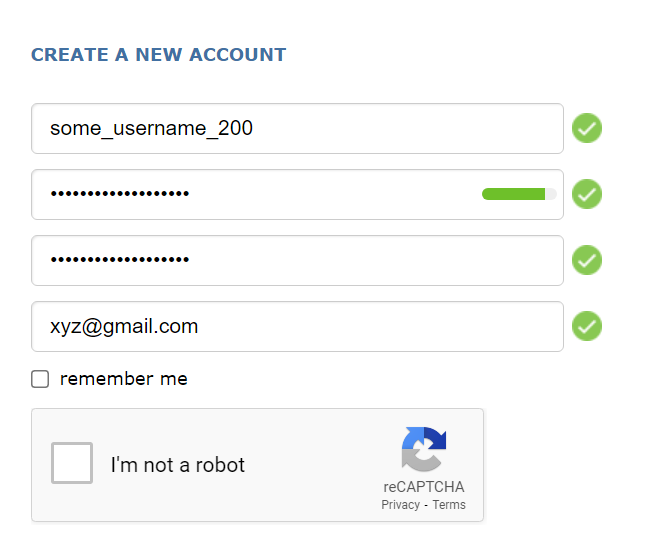
Let us now see the automation of Captchas using an example in Selenium. In the below example, we will automate the SIGN UP page of old.reddit.com.
We will make use of the LambdaTest cloud Selenium Grid to automate our test cases. LambdaTest is a cloud-based cross browser testing platform that supports Selenium Grid, providing a solution to overcome every challenge you might face while performing automation testing on your local machine. Selenium testing tools like LambdaTest offer a Selenium Grid consisting of 3000+ online browsers for you to perform Selenium automation testing effortlessly.
Use Case
Launch the web browser.
Open https://old.reddit.com/login.
Enter username.
Enter password.
Enter the password again in Verify Password.
Enter the email id
Wait for the reCAPTCHA checkbox to appear.
Click on it.
Below is the test class file which will help you to automate the checkbox. Here we have used Java with Selenium for automating Captcha in Selenium WebDriver.
If you’re a developer who’s looking to take your Java development and test engineering skills to the next level, this Selenium Java 101 certification from LambdaTest can help you reach that goal.
Here’s a short glimpse of the Selenium Java 101 certification from LambdaTest:
automateCaptchaInSelenium.java
package LambdaTest;
import org.openqa.selenium.By;
import org.openqa.selenium.WebElement;
import org.openqa.selenium.remote.DesiredCapabilities;
import org.openqa.selenium.remote.RemoteWebDriver;
import org.openqa.selenium.support.ui.ExpectedConditions;
import org.openqa.selenium.support.ui.WebDriverWait;
import org.testng.Reporter;
import org.testng.annotations.AfterClass;
import org.testng.annotations.BeforeClass;
import org.testng.annotations.Test;
import java.net.MalformedURLException;
import java.net.URL;
import java.time.Duration;
public class automateCaptchaInSelenium {
public String username = "YOUR USERNAME";
public String accesskey = "YOUR ACCESSKEY";
public static RemoteWebDriver driver = null;
public String gridURL = "[@hub](http://twitter.com/hub).lambdatest.com/wd/hub";
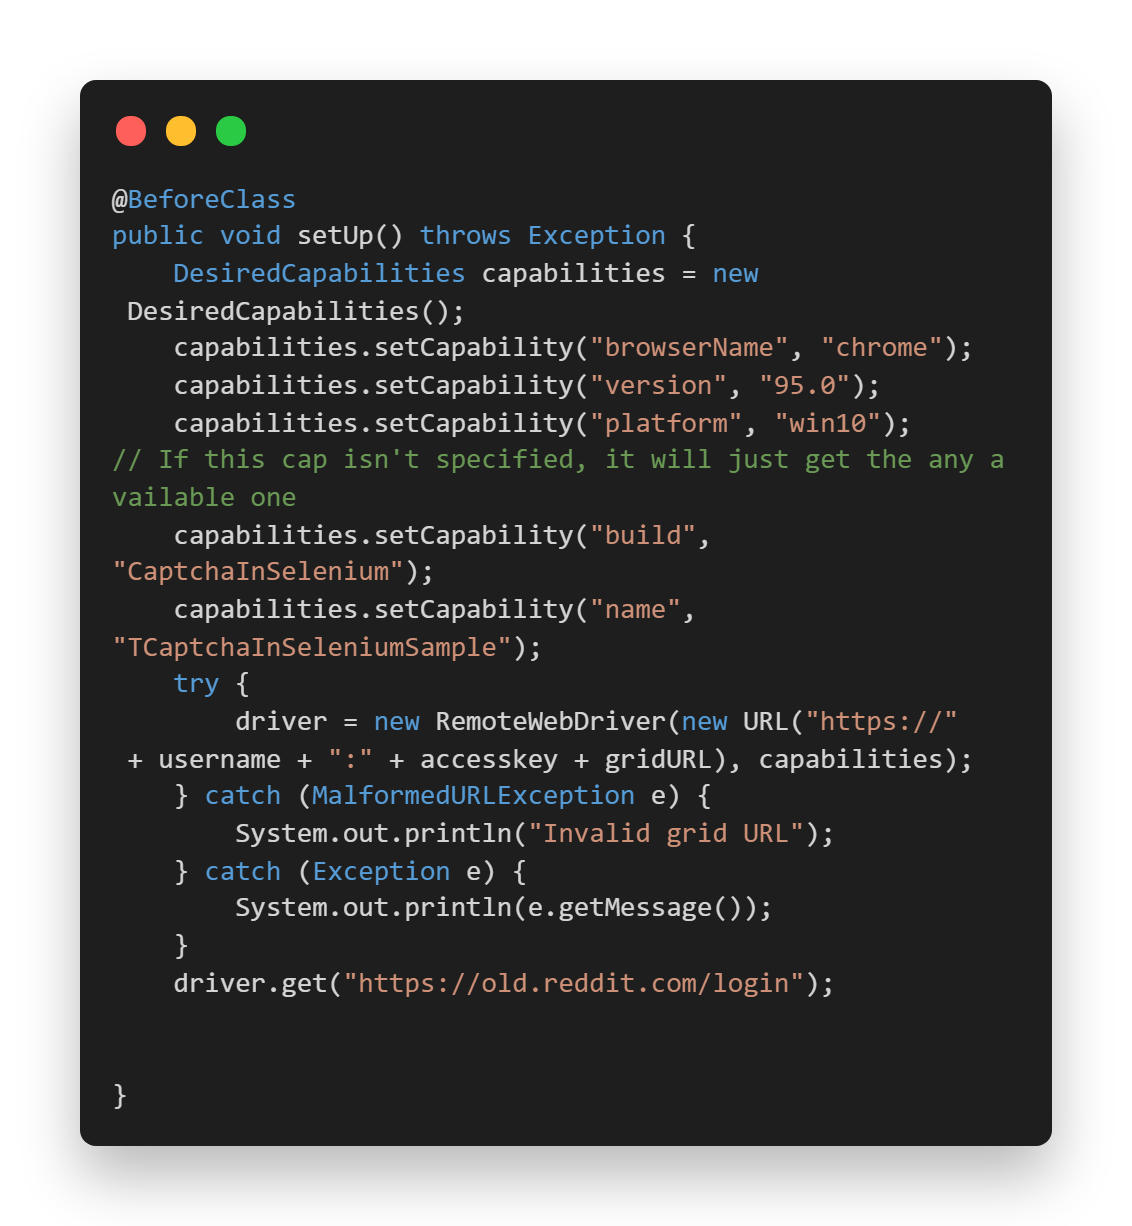
[@BeforeClass](http://twitter.com/BeforeClass)
public void setUp() throws Exception {
DesiredCapabilities capabilities = new DesiredCapabilities();
capabilities.setCapability("browserName", "chrome");
capabilities.setCapability("version", "95.0");
capabilities.setCapability("platform", "win10"); // If this cap isn't specified, it will just get the any available one
capabilities.setCapability("build", "CaptchaInSelenium");
capabilities.setCapability("name", "TCaptchaInSeleniumSample");
try {
driver = new RemoteWebDriver(new URL("https://" + username + ":" + accesskey + gridURL), capabilities);
} catch (MalformedURLException e) {
System.out.println("Invalid grid URL");
} catch (Exception e) {
System.out.println(e.getMessage());
}
driver.get("[https://old.reddit.com/login](https://old.reddit.com/login)");
}
[@Test](http://twitter.com/Test)
public void clickOnRecaptchaCheckBoxInSelenium() {
try {
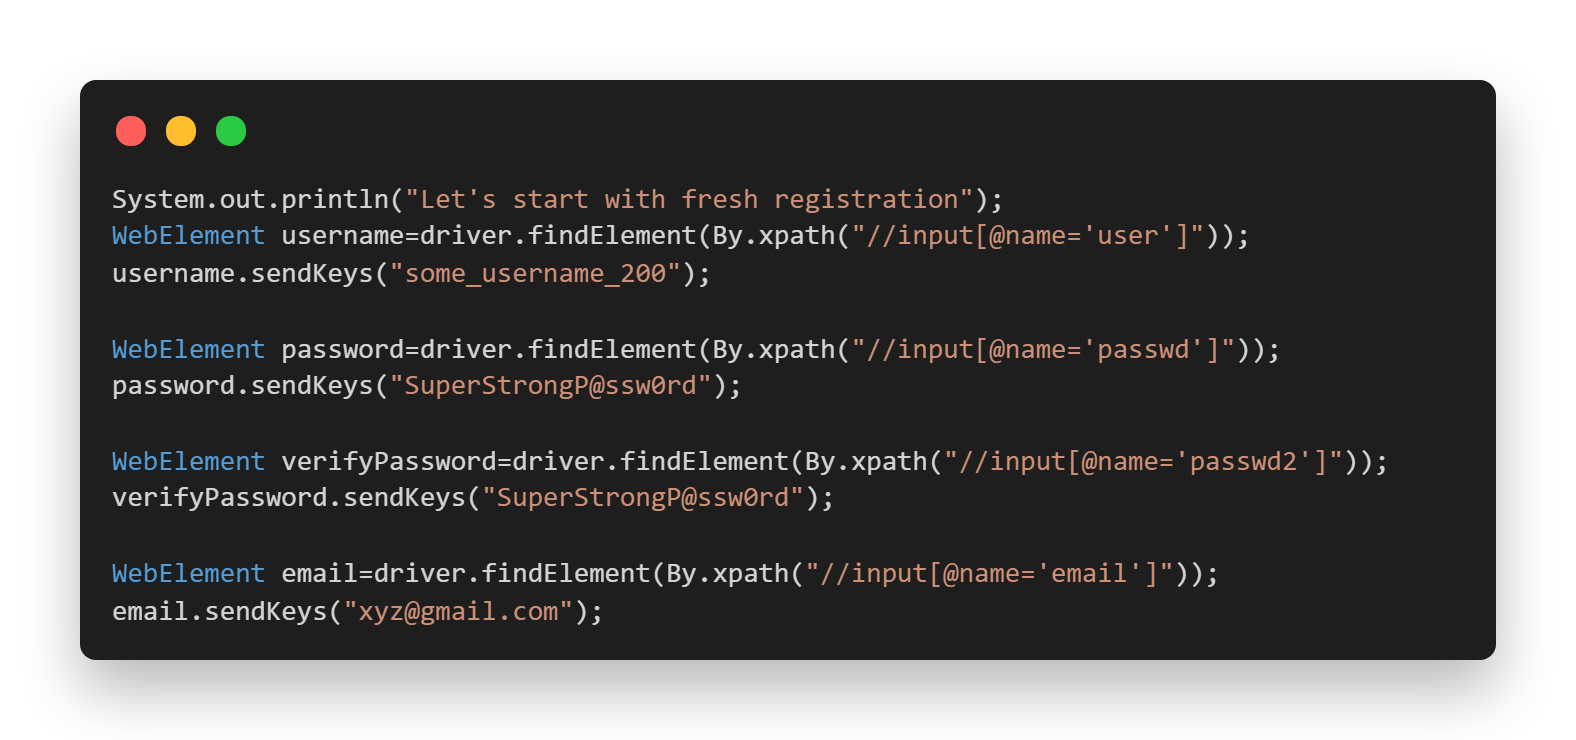
System.out.println("Let's start with fresh registration");
WebElement username=driver.findElement(By.xpath("//input[[@name](http://twitter.com/name)='user']"));
username.sendKeys("some_username_200");
WebElement password=driver.findElement(By.xpath("//input[[@name](http://twitter.com/name)='passwd']"));
password.sendKeys("SuperStrongP@ssw0rd");
WebElement verifyPassword=driver.findElement(By.xpath("//input[[@name](http://twitter.com/name)='passwd2']"));
verifyPassword.sendKeys("SuperStrongP@ssw0rd");
WebElement email=driver.findElement(By.xpath("//input[[@name](http://twitter.com/name)='email']"));
email.sendKeys("[xyz@gmail.com](mailto:xyz@gmail.com)");
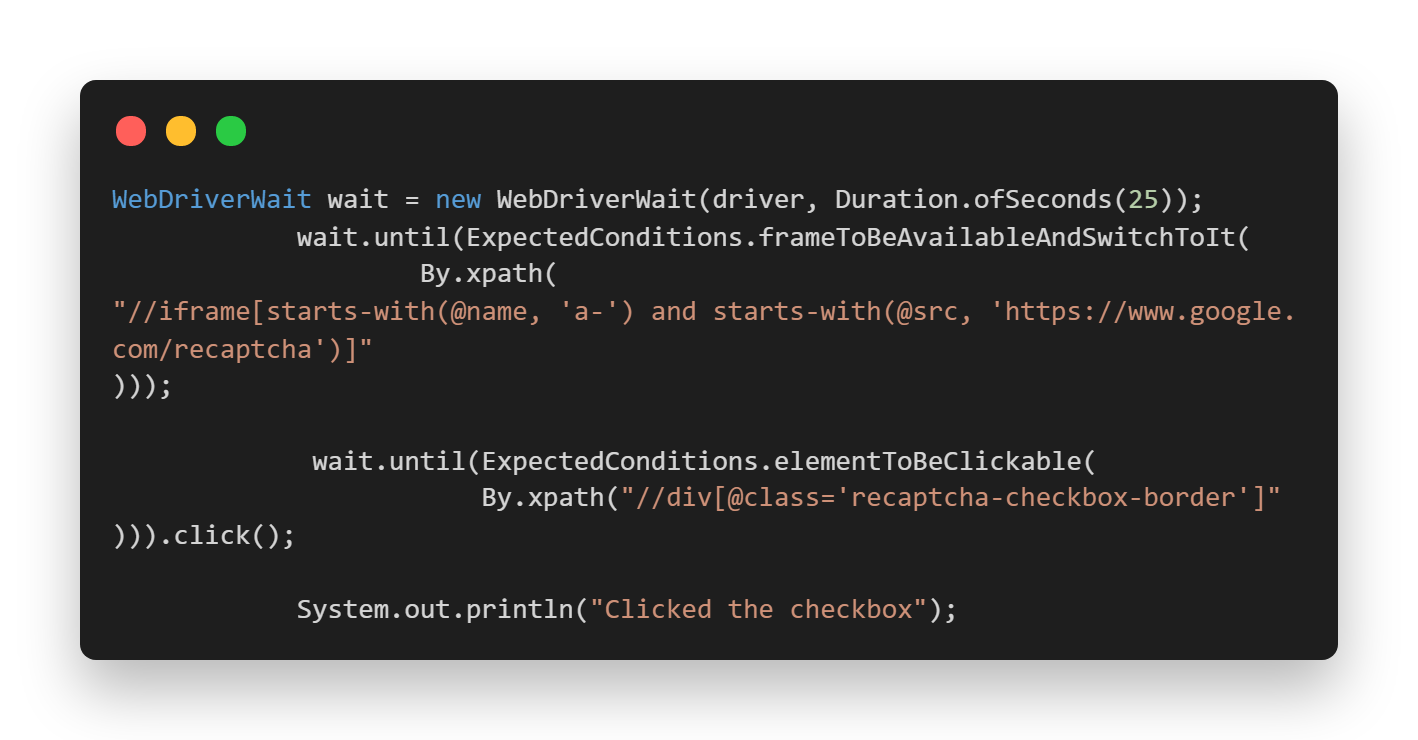
WebDriverWait wait = new WebDriverWait(driver, Duration.ofSeconds(25));
wait.until(ExpectedConditions.frameToBeAvailableAndSwitchToIt(
By.xpath("//iframe[starts-with([@name](http://twitter.com/name), 'a-') and starts-with([@src](http://twitter.com/src), '[https://www.google.com/recaptcha'](https://www.google.com/recaptcha'))]")));
wait.until(ExpectedConditions.elementToBeClickable(
By.xpath("//div[[@class](http://twitter.com/class)='recaptcha-checkbox-border']"))).click();
System.out.println("Clicked the checkbox");
} catch (Exception e) {
}
}
[@AfterClass](http://twitter.com/AfterClass)
public void closeBrowser() {
driver.close();
Reporter.log("Closing the browser", true);
}
}
You can use the below testng.xml file for running the class file.
Testng.xml
<?xml version="1.0" encoding="UTF-8"?>
<!DOCTYPE suite SYSTEM "[http://testng.org/testng-1.0.dtd](http://testng.org/testng-1.0.dtd)">
<suite name="automateCaptchaInSeleniumSuite">
   <test name="automateCaptchaInSeleniumTest">
       <classes>
           <class name="com.infa.dqcloud.testcases.profiling.automateCaptchaInSelenium">

           </class>
       </classes>
   </test>
</suite>
You can check the GitHub link here.
Below is the pom.xml file you will need to install the necessary dependencies.
Pom.xml
<?xml version="1.0" encoding="UTF-8"?>
<project xmlns="[http://maven.apache.org/POM/4.0.0](http://maven.apache.org/POM/4.0.0)"
        xmlns:xsi="[http://www.w3.org/2001/XMLSchema-instance](http://www.w3.org/2001/XMLSchema-instance)"
        xsi:schemaLocation="[http://maven.apache.org/POM/4.0.0](http://maven.apache.org/POM/4.0.0) [http://maven.apache.org/xsd/maven-4.0.0.xsd](http://maven.apache.org/xsd/maven-4.0.0.xsd)">
   <modelVersion>4.0.0</modelVersion>

   <groupId>org.example</groupId>
   <artifactId>LambdaTest</artifactId>
   <version>1.0-SNAPSHOT</version>
   <dependencies>
       <dependency>
           <groupId>org.seleniumhq.selenium</groupId>
           <artifactId>selenium-api</artifactId>
           <version>4.0.0-alpha-7</version>
       </dependency>
       <dependency>
           <groupId>org.seleniumhq.selenium</groupId>
           <artifactId>selenium-remote-driver</artifactId>
           <version>4.0.0-alpha-7</version>
       </dependency>
       <dependency>
           <groupId>org.seleniumhq.selenium</groupId>
           <artifactId>selenium-chrome-driver</artifactId>
           <version>4.0.0-alpha-7</version>
       </dependency>
       <dependency>
           <groupId>org.testng</groupId>
           <artifactId>testng</artifactId>
           <version>6.14.3</version>
       </dependency>
       <dependency>
           <groupId>io.github.bonigarcia</groupId>
           <artifactId>webdrivermanager</artifactId>
           <version>4.4.3</version>
       </dependency>
   </dependencies>

   <properties>
       <maven.compiler.source>8</maven.compiler.source>
       <maven.compiler.target>8</maven.compiler.target>
   </properties>

</project>
Code Walkthrough
Let us now understand the different areas of code in detail.
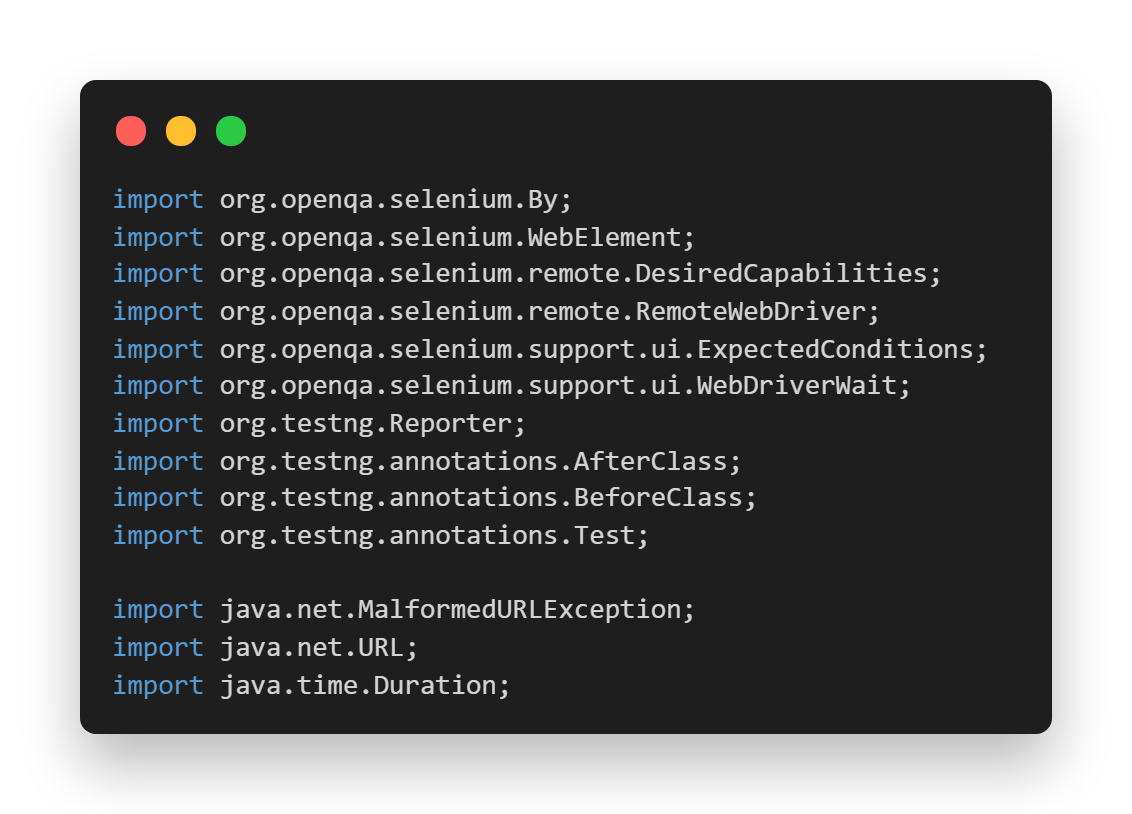
- Imported Dependencies: Here, we have imported all the necessary classes of Selenium WebDriver, WebDriverWait, Desired Capabilities, and RemoteWebDriver to set the respective browser capabilities and run the test cases on the grid.
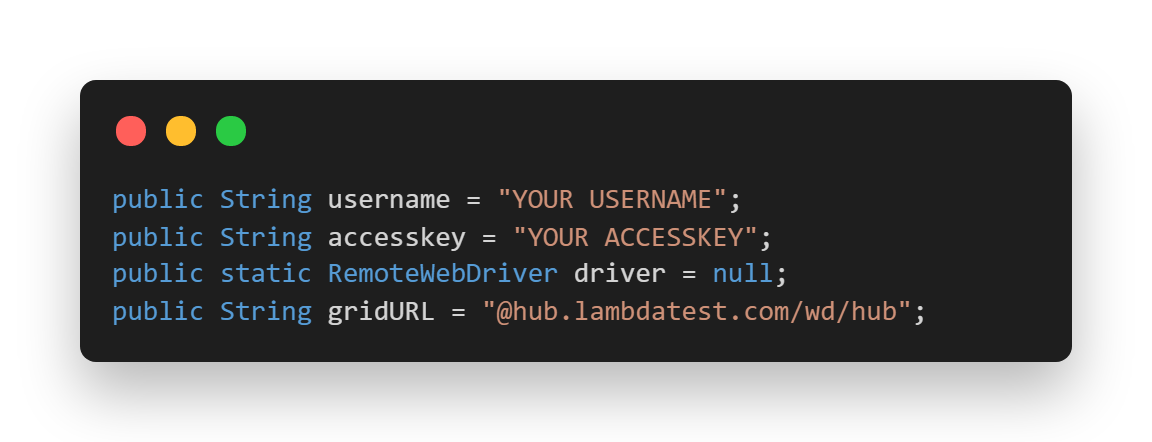
Global Variables: As we have used a Selenium Grid Cloud like LambdaTest to perform our test execution, we are using the below-shown variables.
Here, you can populate the values for your corresponding username and access key, which can be collected by logging into your LambdaTest Profile Section. You can copy the Username and the Access Token to be used in the code. However, the grid URL will remain the same, as shown below.
- @ BeforeClass(Setup Method): Here, we have used the LambdaTest Desired Capabilities Generator and have set the necessary capabilities of browser name, version, platform, etc., for our Selenium Remote WebDriver. After that, we are opening the website in the launched browser.
@ Test(clickOnRecaptchaCheckBoxInSelenium): In this case, we are locating the web elements for username and then entering the username value into it. Similarly, we are locating the corresponding web elements for the password, verify password, and email text boxes as shown in the below image.
We are making use of XPaths in Selenium for locating each element. So, in order to locate the element and write its XPath, you can simply right-click on the web element and click on Inspect. Then, in the Elements tab, you can start writing the locator.
Once all the above elements have been located and their values are entered, we wait for the frame having the reCAPTCHA checkbox to be visible and switch to it. We achieve this by making use of WebDriverWait class and ExpectedConditions. ExpectedConditions in Selenium lets you wait for the occurrence of a specified condition before execution can proceed to the next step. If the condition is not met within the expected time duration, an appropriate exception is raised.
Finally, when we have switched to the frame, we wait for the checkbox to be clickable and finally click on it. In case you are new to iFrames, you can check out the blog on handling iFrames in Selenium.
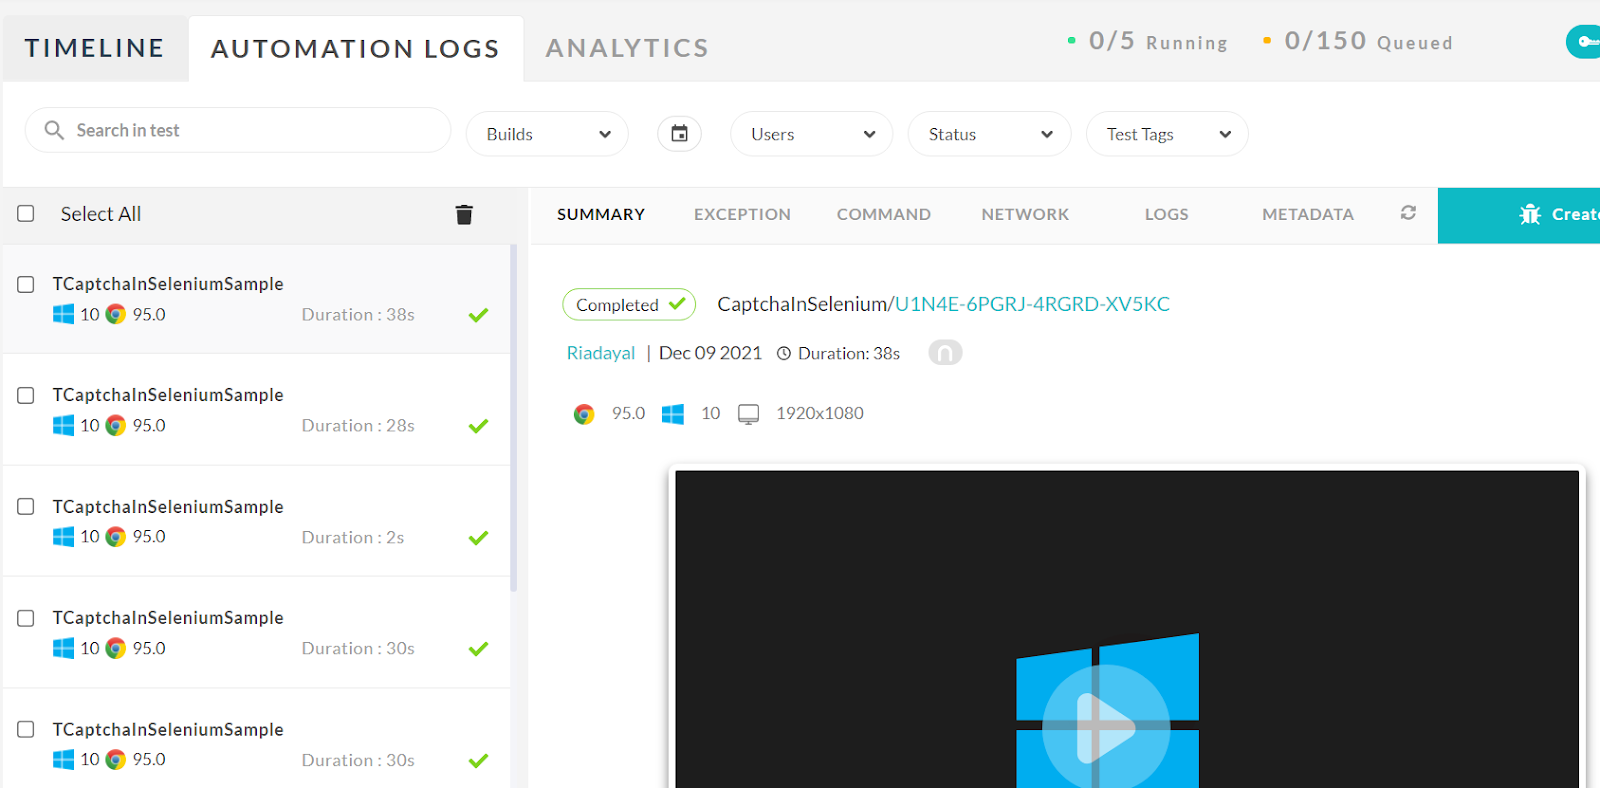
@ AfterTest(closeBrowser): In this method, we are closing the browser that we had launched. Once the tests are completed, you can view the test results, logs, and the test recording as well in your LambdaTest Automation Dashboard.
We saw how to click the reCAPTCHA checkbox in Selenium; however, if you are using Puppeteer or Playwright, you can open an URL containing the captcha and find the specific captcha DOM element, and click the Captcha.
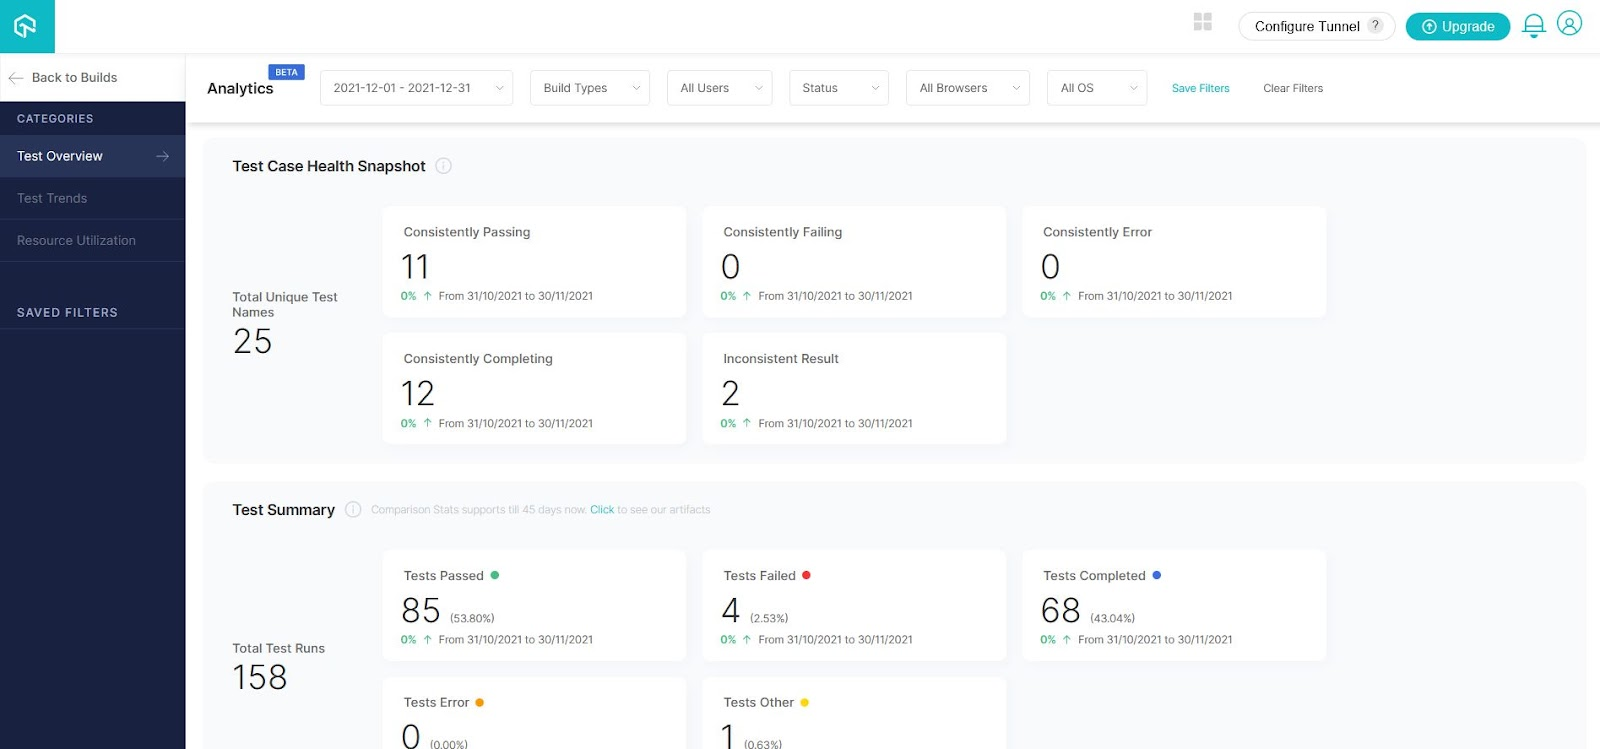
In order to see the Test Overview, you can navigate to the LambdaTest Analytics Dashboard. The Test Overview showcases the Test Case Health Snapshot for tests that consistently pass, consistently fail, etc. Test Summary, on the other hand, displays the total number of tests passed, failed, completed, etc.
Note: org.junit.runners.model.TestTimedOutException — This happens when test is not able complete within the specified time in junit.
Solving Captcha issues in Selenium
With this approach, your test will detect the Captcha and wait for a specific amount of time, allowing you to enter the correct captcha answer. While waiting for the captcha answer, you will need to manually look at the captcha question, solve the captcha and pass the answer to the (automated) test.
However, this option to handle Captcha in Selenium is not recommended, as it requires manual intervention during an automated test, and as a result, the test case is not 100% automated.
We can achieve it again by using WebDriverWait in Selenium and giving the user the time to solve the captcha manually. WebDriver will wait till the next action is ready.
We can see the same Use Case where once the reCAPTCHA checkbox has been clicked, we wait till the SIGN UP button gets enabled, and by the time the user gets the opportunity to solve the Captcha manually.
Below is the test class file you can use to automate the scenario.
automateCaptchaInSelenium.java
package LambdaTest;
import org.openqa.selenium.By;
import org.openqa.selenium.WebElement;
import org.openqa.selenium.remote.DesiredCapabilities;
import org.openqa.selenium.remote.RemoteWebDriver;
import org.openqa.selenium.support.ui.ExpectedConditions;
import org.openqa.selenium.support.ui.WebDriverWait;
import org.testng.Reporter;
import org.testng.annotations.AfterClass;
import org.testng.annotations.BeforeClass;
import org.testng.annotations.Test;
import java.net.MalformedURLException;
import java.net.URL;
import java.time.Duration;
public class automateCaptchaInSelenium {
public String username = "YOUR USERNAME";
public String accesskey = "YOUR ACCESSKEY";
public static RemoteWebDriver driver = null;
public String gridURL = "[@hub](http://twitter.com/hub).lambdatest.com/wd/hub";
[@BeforeClass](http://twitter.com/BeforeClass)
public void setUp() throws Exception {
DesiredCapabilities capabilities = new DesiredCapabilities();
capabilities.setCapability("browserName", "chrome");
capabilities.setCapability("version", "95.0");
capabilities.setCapability("platform", "win10"); // If this cap isn't specified, it will just get the any available one
capabilities.setCapability("build", "CaptchaInSelenium");
capabilities.setCapability("name", "TCaptchaInSeleniumSample");
try {
driver = new RemoteWebDriver(new URL("https://" + username + ":" + accesskey + gridURL), capabilities);
} catch (MalformedURLException e) {
System.out.println("Invalid grid URL");
} catch (Exception e) {
System.out.println(e.getMessage());
}
driver.get("[https://old.reddit.com/login](https://old.reddit.com/login)");
}
[@Test](http://twitter.com/Test)
public void manuallySolveCaptchaWithDelayInSelenium() {
try {
System.out.println("Let's start with fresh registration");
WebElement username=driver.findElement(By.xpath("//input[[@name](http://twitter.com/name)='user']"));
username.sendKeys("some_username_200");
WebElement password=driver.findElement(By.xpath("//input[[@name](http://twitter.com/name)='passwd']"));
password.sendKeys("SuperStrongP@ssw0rd");
WebElement verifyPassword=driver.findElement(By.xpath("//input[[@name](http://twitter.com/name)='passwd2']"));
verifyPassword.sendKeys("SuperStrongP@ssw0rd");
WebElement email=driver.findElement(By.xpath("//input[[@name](http://twitter.com/name)='email']"));
email.sendKeys("[xyz@gmail.com](mailto:xyz@gmail.com)");
WebDriverWait wait = new WebDriverWait(driver, Duration.ofSeconds(25));
wait.until(ExpectedConditions.frameToBeAvailableAndSwitchToIt(
By.xpath("//iframe[starts-with([@name](http://twitter.com/name), 'a-') and starts-with([@src](http://twitter.com/src), '[https://www.google.com/recaptcha'](https://www.google.com/recaptcha'))]")));
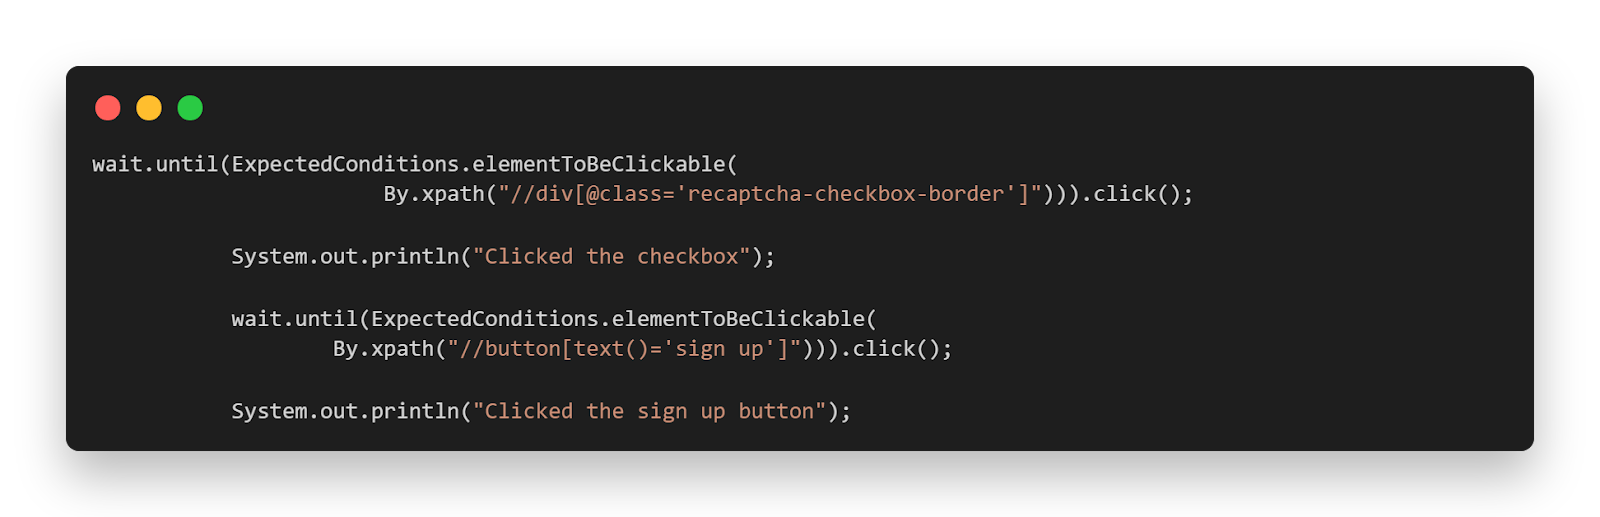
wait.until(ExpectedConditions.elementToBeClickable(
By.xpath("//div[[@class](http://twitter.com/class)='recaptcha-checkbox-border']"))).click();
System.out.println("Clicked the checkbox");
wait.until(ExpectedConditions.elementToBeClickable(
By.xpath("//button[text()='sign up']"))).click();
System.out.println("Clicked the sign up button");
} catch (Exception e) {
}
}
[@AfterClass](http://twitter.com/AfterClass)
public void closeBrowser() {
driver.close();
Reporter.log("Closing the browser", true);
}
}
You can use the below testng.xml file for running the class file.
Testng.xml
<?xml version="1.0" encoding="UTF-8"?>
<!DOCTYPE suite SYSTEM "[http://testng.org/testng-1.0.dtd](http://testng.org/testng-1.0.dtd)">
<suite name="automateCaptchaInSeleniumSuite">
   <test name="automateCaptchaInSeleniumTest">
       <classes>
           <class name="com.infa.dqcloud.testcases.profiling.automateCaptchaInSelenium">

           </class>
       </classes>
   </test>
</suite>
Code Walkthrough
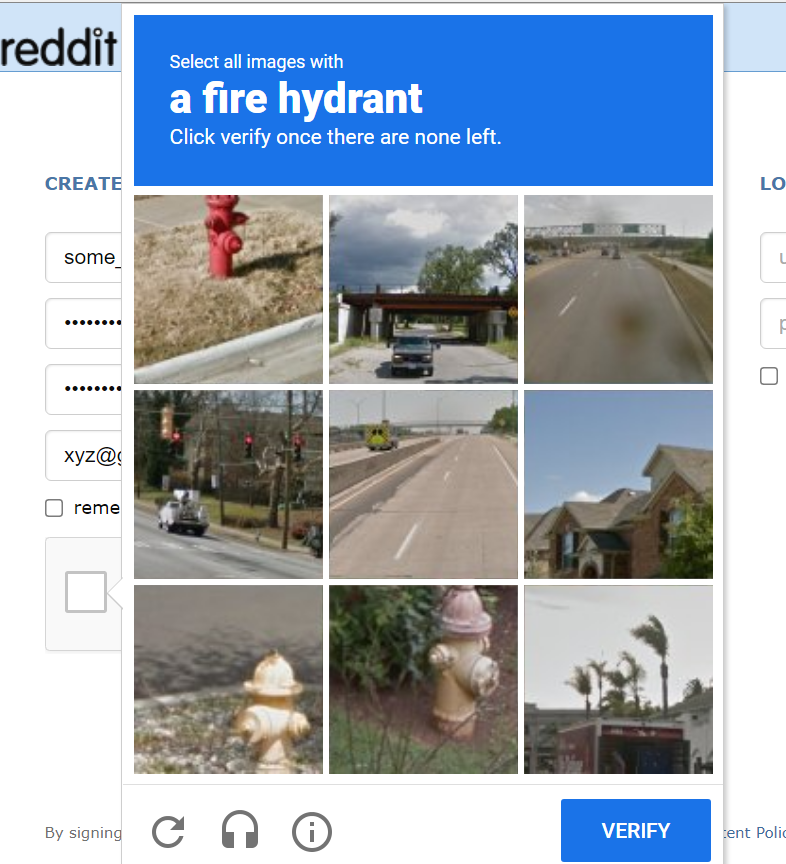
Here, everything remains the same as explained in the code walkthrough of our first example except the part where we wait for the SIGN UP button to be clickable after the checkbox has been clicked. Now, after the reCAPTCHA checkbox has been clicked, the screen selects the applicable images. Once that is done, the SIGN UP button gets clickable. Hence, when the user manually solves the captcha, the web driver waits for the SIGN UP button to get clickable.
How to handle invisible reCaptcha in Selenium?
reCAPTCHA v2 offers an invisible captcha, which does not require the user to perform any interaction with the captcha. Unfortunately, the invisible captcha tries to block the web traffic that appears to come from a bot, so in order to avoid this, you can:
- Change the user-agent of your test script.
How to change the user agent?
- For Chrome
In case you are using the Chrome browser follow the below steps:
First, you should add a User-Agent Switcher to your Chrome browser.
Then, go to User-Agent Switcher settings at Chrome extensions section and get the desired agent’s information.
Later, in your test script, you can make use of the ChromeOptions class and add the corresponding arguments as shown below in the Before Setup Method.
ChromeOptions options = new ChromeOptions();
options.addArguments("--user-agent=Mozilla/5.0 (Linux; Android 6.0; HTC One M9 Build/MRA58K) AppleWebKit/537.36 (KHTML, like Gecko) Chrome/52.0.2743.98 Mobile Safari/537.36");
driver = new ChromeDriver(options);
- For Firefox
In case you are using the Firefox browser follow the below steps.
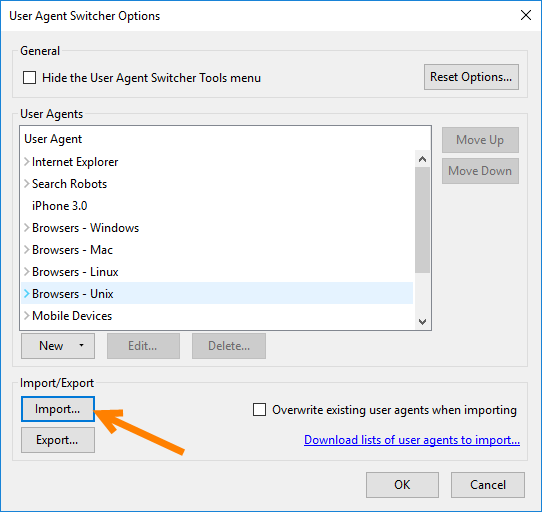
First, you should add User-Agent Switcher to your Firefox browser.
Save all device lists to the desktop and import them as shown below.
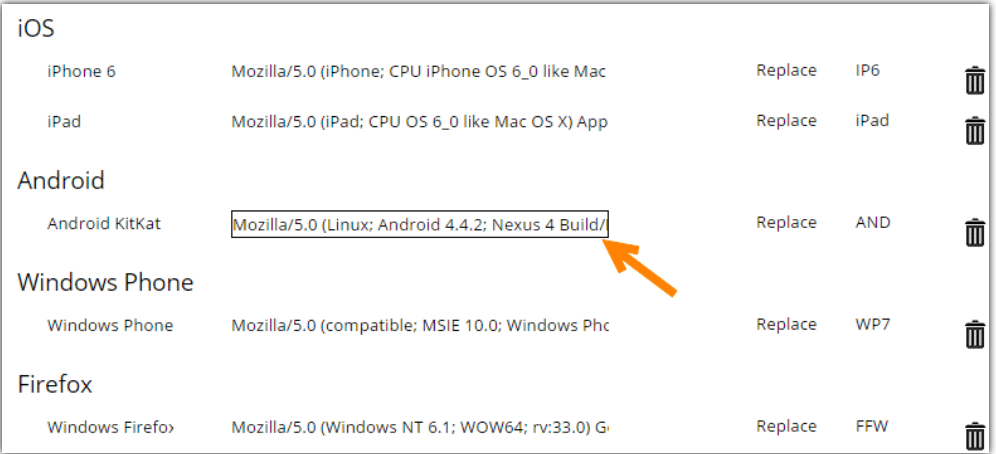
3- Go to Tools-> Default User Agent -> Edit User Agents

4- Then select Mobile Devices -> Devices -> HTC -> One M9 — Android 6.0 -Chrome 52.0 and then click Edit.
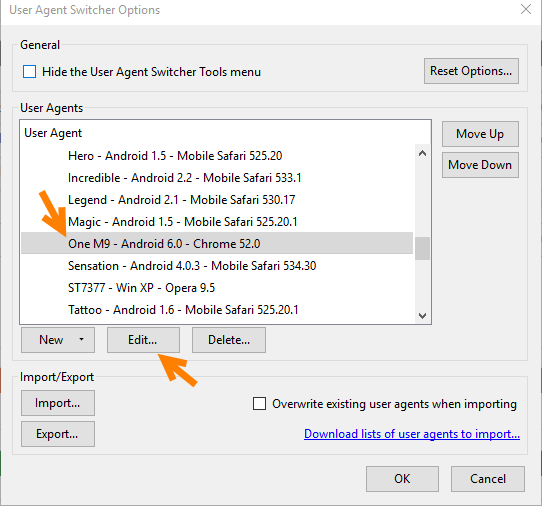
Then, you can see the user agent value of the HTC One M9 as shown below. Copy and save these values for user agent manipulation in our selenium web driver test automation code.
Later you can use the setPreference method in your BeforeSetup method with the general.useragent.override flag and pass the value you had collected in the previous step.
FirefoxProfile profile = new FirefoxProfile();
//Change User Agent to HTC ONE M9
profile.setPreference("general.useragent.override", "Mozilla/5.0 (Linux; Android 6.0; HTC One M9 Build/MRA58K) AppleWebKit/537.36 (KHTML, like Gecko) Chrome/52.0.2743.98 Mobile Safari/537.36");
driver = new FirefoxDriver(profile);
These were some of the ways of handling invisible reCAPTCHAs in Firefox and Chrome browsers.
Conclusion
We know that automating Captchas in Selenium is not one of the best practices. However, we might need to replicate our actual use case. In this article on how to handle Captcha in Selenium, we read what are Captchas and how we can deal with them in Selenium automation testing. We also read about reCAPCTHAs and how to disable them in testing environments, followed by how to automate Captcha in Selenium WebDriver. Run your WebdriverIO tests & start your free testing. In the end, we also saw what Invisible Captchas are and how to handle them.
I hope you learned something new about Captchas in Selenium and enjoyed reading this blog. Happy Testing!!


![FindElement And FindElements In Selenium [Differences]](/_next/image?url=https%3A%2F%2Fcdn.hashnode.com%2Fres%2Fhashnode%2Fimage%2Fupload%2Fv1649337848892%2FHnpgHrasW.jpg&w=3840&q=75)