Table of contents
- How to find an Element in Selenium?
- Syntax to find an Element in Selenium
- How to find Elements in Selenium?
- Syntax to find Elements in Selenium
- Difference between findElement and findElements in Selenium Java
- Locator Strategies of findElement and findElements in Selenium Java
- Find Element by ID
- Find Element by Name
- Find Element by ClassName
- Find Element by TagName
- Find Element by Link Text
- Find Element by Partial Link Text
- Find Element by CSS Selector
- Find Element by XPath
- Conclusion
Finding an element in Selenium can be both interesting and complicated at the same time. If you are not using the correct method for locating an element, it could sometimes be a nightmare. For example, if you have a web element with both ID and Text attributes, ID remains constantly changing, whereas Text remains the same. Using an ID locator to locate web elements can impact all your test cases, and imagine the regression results over a few builds in such cases. This is where the methods findElement and findElements in Selenium can help.
](https://cdn-images-1.medium.com/max/2000/1*lxRkHHEt-GUE01RTokqbSQ.png)
The findElement method in Selenium can help you enormously while using Selenium locators for finding web elements while performing Selenium automation testing. Let’s see the different implements of findElement in Selenium and the differences between findElement and findElements in Selenium.
Let’s get started!!
How to find an Element in Selenium?
When you start to write your Selenium automation script, interaction with web elements becomes your first vital step because it’s the web elements you play around with within your test script. However, interaction with these web elements can only happen if you identify them using the right approach.
findElement method in Selenium is a command which helps you identify a web element. There are multiple ways that findElement provides to uniquely identify a web element within the web page using web locators in Selenium like ID, Name, Class Name, Link Text, Partial Link Text, Tag, which we will see later in the blog.
For now, let’s see the syntax of using findElement in Selenium. We would be using Selenium with Java for the implementation.
Syntax to find an Element in Selenium
The syntax to find an Element in Selenium is:
WebElement elementName= driver.findElement(By.<LocatorStrategy>("LocatorValue"));
As shown in the above syntax, this command accepts the “By” object as the argument and returns a WebElement object. The “By” is a locator or query object and accepts the locator strategy. The Locator Strategy can assume the below values:
ID
Name
Class Name
Tag Name
Link Text
Partial Link Text
XPath
CSS Selector
For example, if you want to use ID as the Locator Strategy to identify any web element, it would look like below.
WebElement ele1 = driver.findElement(By.id(“id”))
The Locator Strategy further accepts the Locator Value to identify a web element uniquely.
If there is no matching element within the web page, findElement throws NoSuchElementException.
Let us understand it using an example.
Use Case:
Log in to Selenium Playground offered by LambdaTest.
Try to find a web element that is not present on the screen.
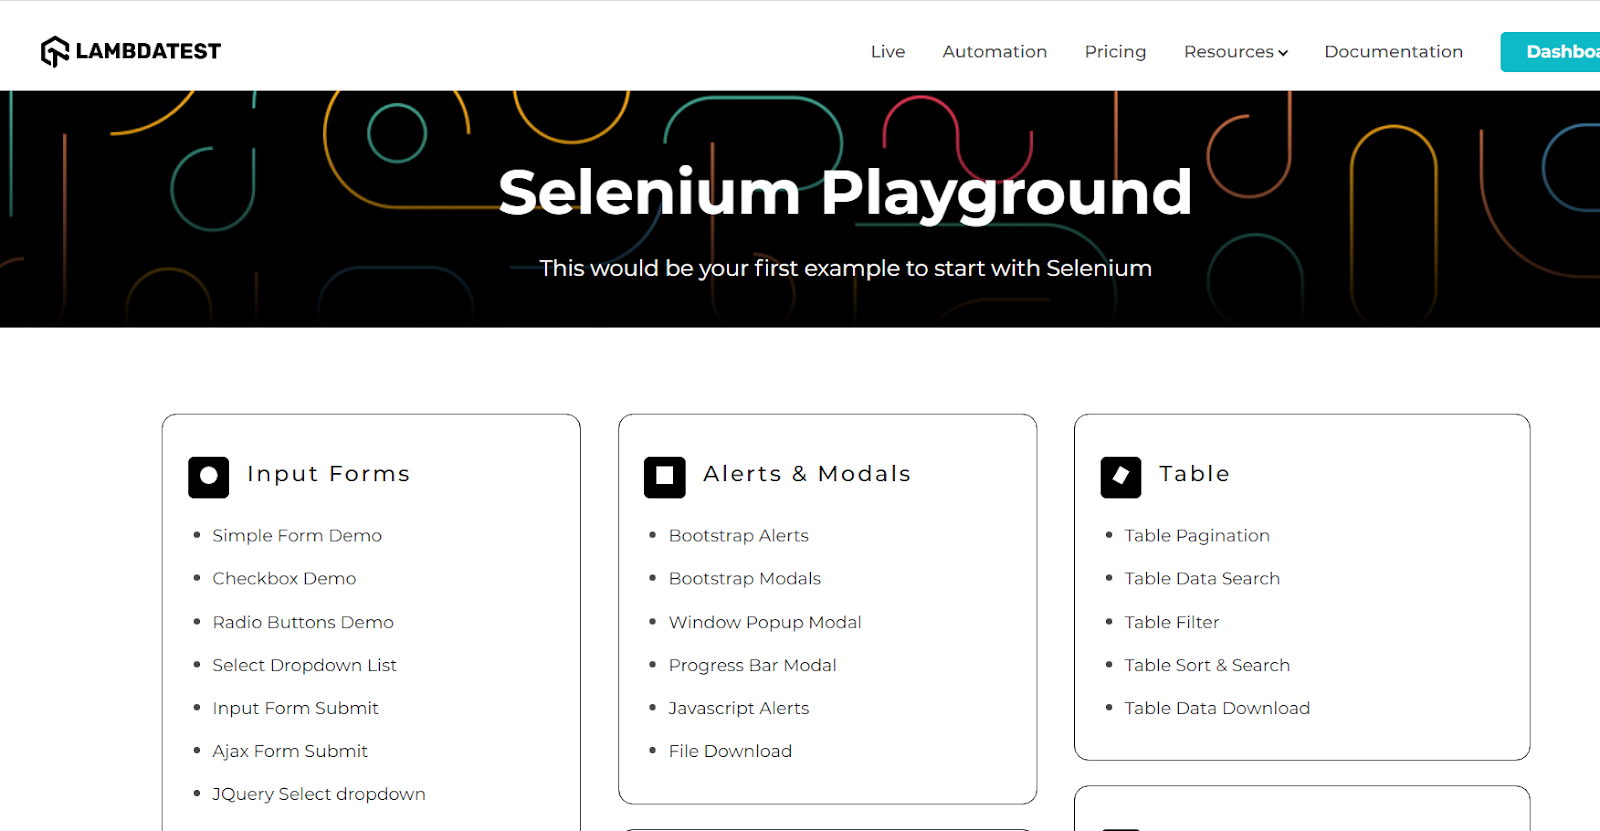
LambdaTest is a cloud-based cross browser testing platform that supports Selenium Grid, providing a solution to every obstacle you face while performing Selenium automation testing using your local machine. Selenium testing tools like LambdaTest offer an online Selenium Grid consisting of 3000+ online browsers for you to perform Selenium automation testing effortlessly.
Refer to the below test case for the above scenario:
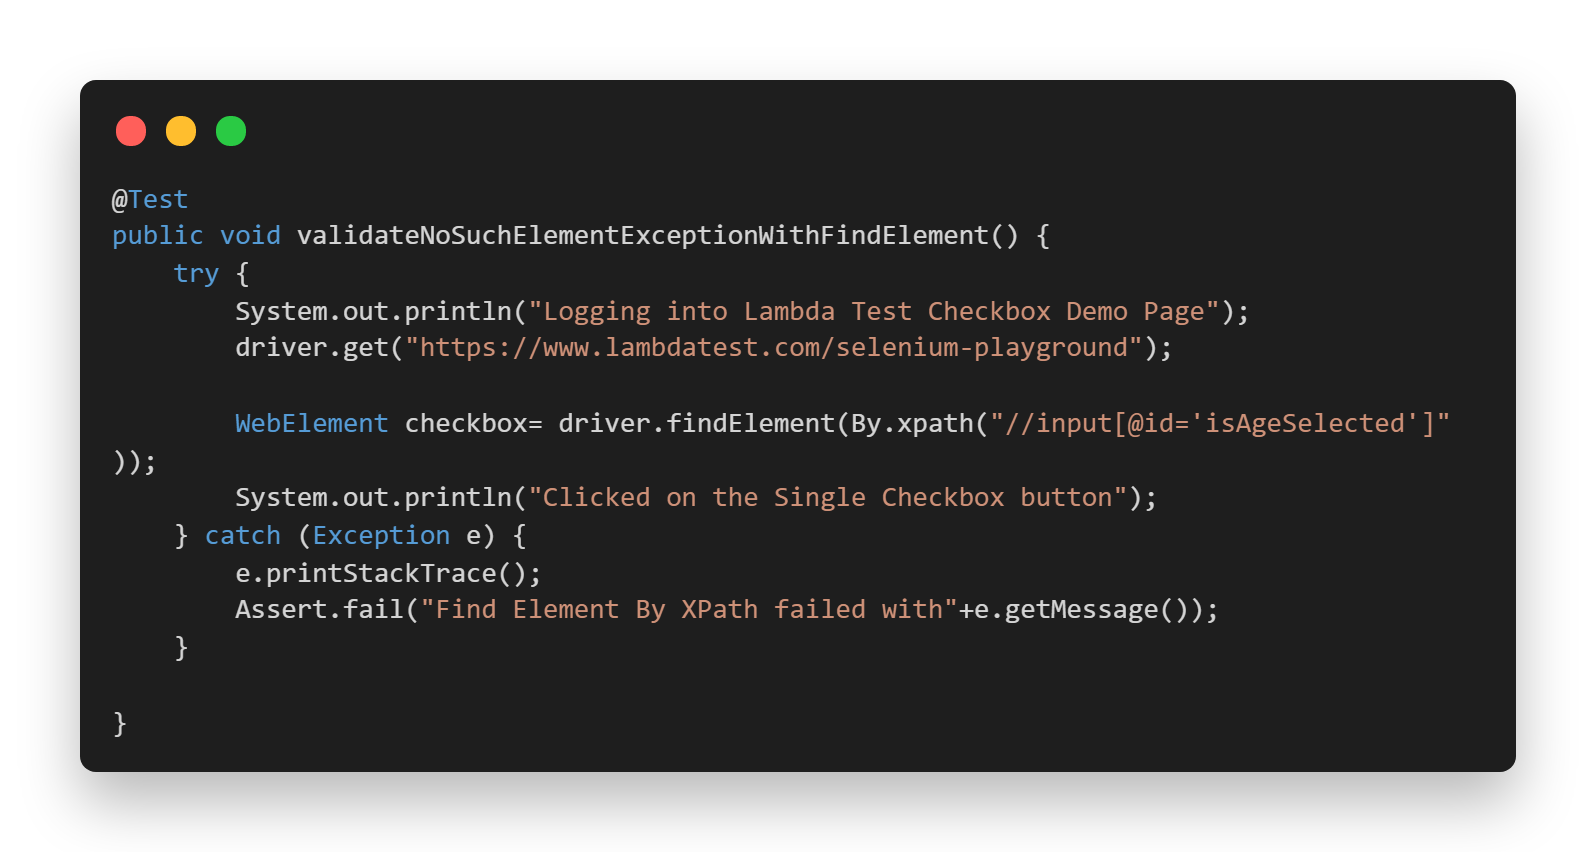
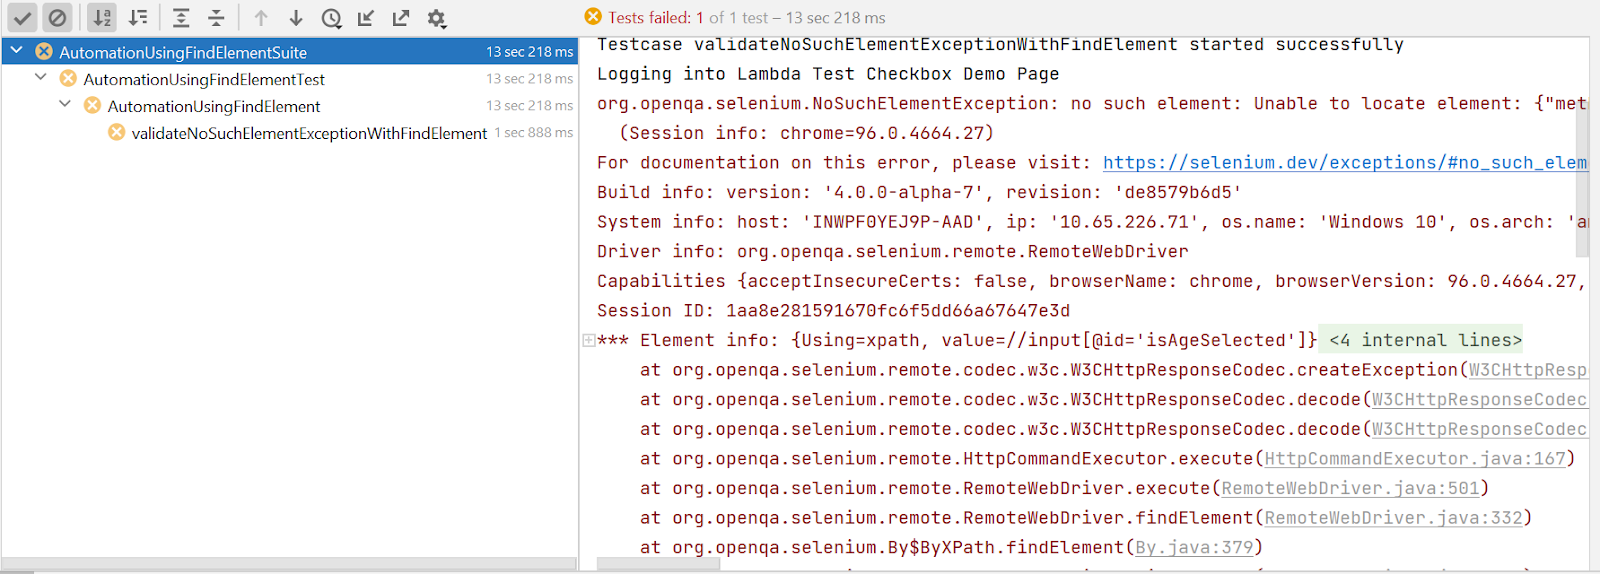
In the above test case, the checkbox web element is not present on the Selenium Playground main home page, and hence, it will throw NoSuchElementException. Check out the console output in this case.
Console Output:
Now, you must be wondering, what if the locator value returns multiple matching elements? FindElement would return you the first element within the web page which matches the locator value. The next question arises: What if you need all those matching web elements? This is where findElements in Selenium comes into the picture.
Let’s see what findElements has to offer!!
Note: org.junit.rules.ExpectedException
The ExpectedException is a rule which helps scripts to verify that the script throws the specific exception or not
How to find Elements in Selenium?
findElements in Selenium returns you the list of web elements that match the locator value, unlike findElement, which returns only a single web element. If there are no matching elements within the web page, findElements returns an empty list.
Syntax to find Elements in Selenium
The syntax to find Elements in Selenium is:
List<WebElement> elementName = driver.findElements(By.<LocatorStrategy>("LocatorValue"));
findElements in Selenium example: If you want to use ID as the Locator Strategy for identifying a list of web elements, it would look something like below:
List<WebElement> ele1 = driver.findElements(By.id(“id”))
Similar to the findElement() command, this method also accepts the “By” object as the parameter and returns a list of web elements.
Now, since we have seen findElement and findElements in Selenium example, let’s understand the difference between the findElement and findElements in Selenium Java.
Difference between findElement and findElements in Selenium Java
Now that we read about findElement and findElements, let’s have a quick look at their major differences.
| findElement | findElements |
| Returns the first matching web element within the web page even if multiple web elements match the locator value. | Returns a list of multiple web elements matching the locator value. |
| Throws NoSuchElementException in case there are no matching elements. | Returns an empty list in case there are no matching elements. |
| Returns a single web element | Returns a collection of web elements. |
| No indexing is required since only one element is returned. | Each web element is indexed starting from 0. |
Note: The latest version of Selenium is Selenium 4 when writing this article. This Selenium WebDriver Tutorial for beginners and professionals will help you learn what’s new in Selenium 4 (Features and Improvements).
You can follow the LambdaTest YouTube Channel and stay updated with the latest tutorials around Selenium testing, Cypress testing, CI/CD, and more.
Locator Strategies of findElement and findElements in Selenium Java
Let us now understand the various locator strategies that can be used with findElement and findElements in Selenium Java. We will see their implementation making use of Selenium Playground offered by LambdaTest.
We will also make use of the LambdaTest cloud Selenium Grid to automate our test cases.
Selenium Grid refers to a software testing setup that enables QAs to perform parallel tests across multiple browsers and devices with unique operating systems. When the entire setup of Selenium Grid is accessible using cloud-based servers, it is called Selenium Grid On Cloud. An online Selenium Grid helps you focus on writing better Selenium test scripts rather than worrying about infrastructure maintenance.
Find Element by ID
As we all know, the ID locator in Selenium is one of the widely used locators for locating desired WebElement on a document (or page). If a website uses dynamically generated IDs, this strategy cannot uniquely find an element. However, it will still return the first web element which matches the locator value.
For example, If you have a web element with a tag as Button which has a dynamic ID, where ID is getting changed from ‘ID-3465-text1’ to ‘ID-4434-textE2’, in such cases, it becomes difficult to use the ID attribute. However, if it remains static, you can easily use the ID to locate the Web Element.
Syntax to find Element by ID:
WebElement elementName = driver.findElement(By.id(“id value”));
Use Case:
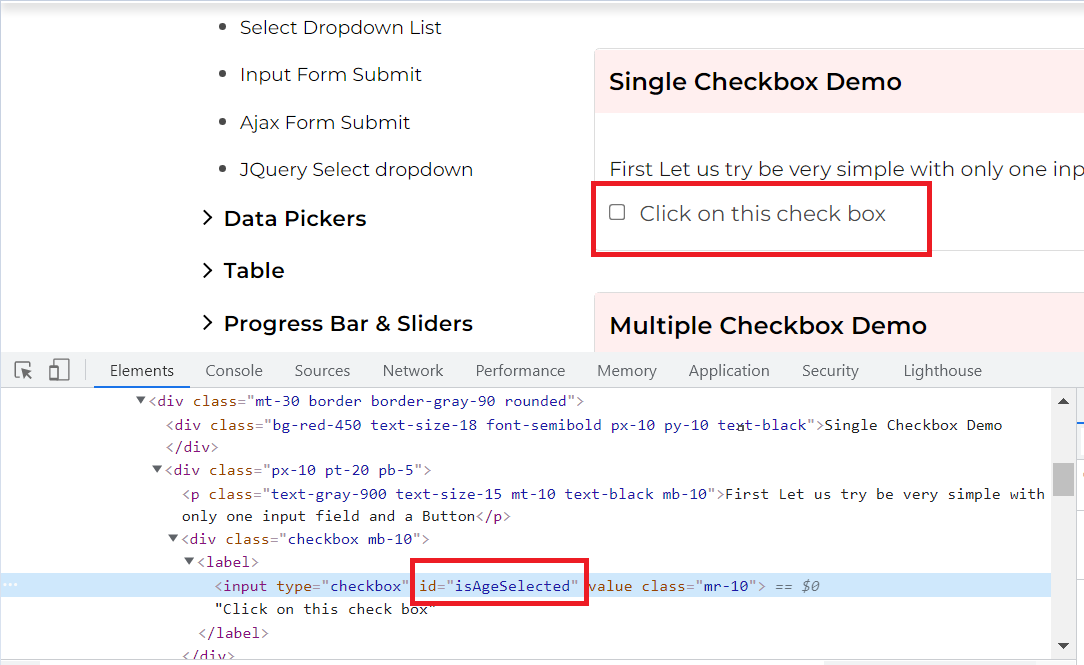
Let us see the checkbox demo page of Selenium Playground and locate the checkbox web element using ID. Further, we will click on the same checkbox and validate the success message.
Locator:
The correct locator value making use of id in the above case would be
WebElement checkBox = driver.findElement(By.id(“isAgeSelected”));
Implementation:
Consider the below test case file.
package LambdaTest;

import io.github.bonigarcia.wdm.WebDriverManager;
import org.openqa.selenium.By;
import org.openqa.selenium.WebElement;
import org.openqa.selenium.chrome.ChromeDriver;
import org.openqa.selenium.remote.DesiredCapabilities;
import org.openqa.selenium.remote.RemoteWebDriver;
import org.testng.Assert;
import org.testng.annotations.AfterTest;
import org.testng.annotations.BeforeTest;
import org.testng.annotations.Listeners;
import org.testng.annotations.Test;
import org.openqa.selenium.support.ui.Select;
import java.net.MalformedURLException;
import java.net.URL;

@Listeners({util.Listener.class})
class AutomationUsingFindElement {

    public String username = "YOUR USERNAME";
    public String accesskey = "YOUR ACCESSKEY";
    public static RemoteWebDriver driver = null;
    public String gridURL = "@hub.lambdatest.com/wd/hub";

    @BeforeTest
    public void setUp() throws Exception {
        DesiredCapabilities capabilities = new DesiredCapabilities();
        capabilities.setCapability("browserName", "chrome");
        capabilities.setCapability("version", "96.0");
        capabilities.setCapability("platform", "win10"); // If this cap isn't specified, it will just get the any available one
        capabilities.setCapability("build", "AutomationUsingFindElement");
        capabilities.setCapability("name", "AutomationUsingFindElementSuite");
        try {
            driver = new RemoteWebDriver(new URL("https://" + username + ":" + accesskey + gridURL), capabilities);
        } catch (MalformedURLException e) {
            System.out.println("Invalid grid URL");
        } catch (Exception e) {
            System.out.println(e.getMessage());
        }
    }


    @Test
    public void findElementById() {
        try {
            System.out.println("Logging into Lambda Test Checkbox Demo Page");
            driver.get("https://www.lambdatest.com/selenium-playground/checkbox-demo");

            WebElement checkBox= driver.findElement(By.id("isAgeSelected"));
            checkBox.click();
            System.out.println("Clicked on the Checkbox");

            WebElement successMessage=driver.findElement(By.id("txtAge"));
            String expectedMessage=successMessage.getText();

            Assert.assertEquals("Success - Check box is checked", expectedMessage);
        } catch (Exception e) {

        }

    }

    @AfterTest
    public void closeBrowser() {
        driver.close();
        System.out.println("The driver has been closed.");

    }

}
You can use the below testng.xml file for running the test case.
<?xml version="1.0" encoding="UTF-8"?>
<!DOCTYPE suite SYSTEM "http://testng.org/testng-1.0.dtd">
<suite  name="AutomationUsingFindElementSuite">

    <test name="AutomationUsingFindElementTest" >
        <classes>
            <class name="LambdaTest.AutomationUsingFindElement" >
            </class>
        </classes>
    </test>
</suite>
You can use the below pom.xml file for installing the necessary dependencies.
<?xml version="1.0" encoding="UTF-8"?>
<project xmlns="http://maven.apache.org/POM/4.0.0"
         xmlns:xsi="http://www.w3.org/2001/XMLSchema-instance"
         xsi:schemaLocation="http://maven.apache.org/POM/4.0.0 http://maven.apache.org/xsd/maven-4.0.0.xsd">
    <modelVersion>4.0.0</modelVersion>

    <groupId>org.example</groupId>
    <artifactId>LambdaTest</artifactId>
    <version>1.0-SNAPSHOT</version>
    <dependencies>
        <dependency>
            <groupId>org.seleniumhq.selenium</groupId>
            <artifactId>selenium-api</artifactId>
            <version>4.0.0-alpha-7</version>
        </dependency>
        <dependency>
            <groupId>org.seleniumhq.selenium</groupId>
            <artifactId>selenium-remote-driver</artifactId>
            <version>4.0.0-alpha-7</version>
        </dependency>
        <dependency>
            <groupId>org.seleniumhq.selenium</groupId>
            <artifactId>selenium-chrome-driver</artifactId>
            <version>4.0.0-alpha-7</version>
        </dependency>
        <dependency>
            <groupId>org.testng</groupId>
            <artifactId>testng</artifactId>
            <version>6.14.3</version>
        </dependency>
        <dependency>
            <groupId>io.github.bonigarcia</groupId>
            <artifactId>webdrivermanager</artifactId>
            <version>4.4.3</version>
        </dependency>
    </dependencies>

    <properties>
        <maven.compiler.source>8</maven.compiler.source>
        <maven.compiler.target>8</maven.compiler.target>
    </properties>

</project>
Code Walkthrough:
Let us now understand the different areas of code in detail.
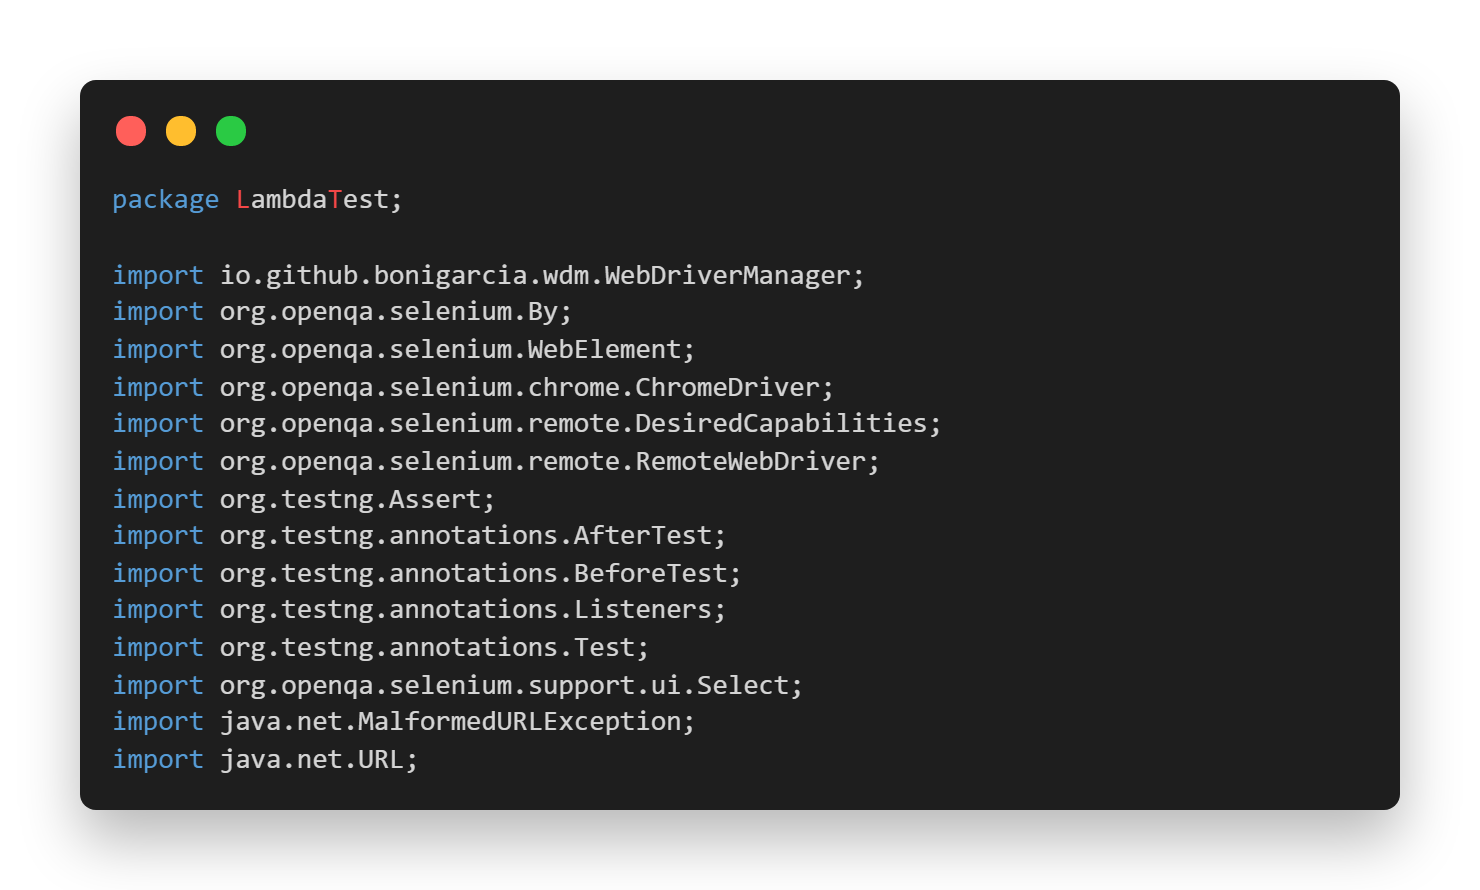
1. Imported Dependencies: Here, we have imported all the necessary classes of Selenium WebDriver, WebDriverWait, Desired Capabilities, and RemoteWebDriver to set the respective browser capabilities and run the test cases on the grid.
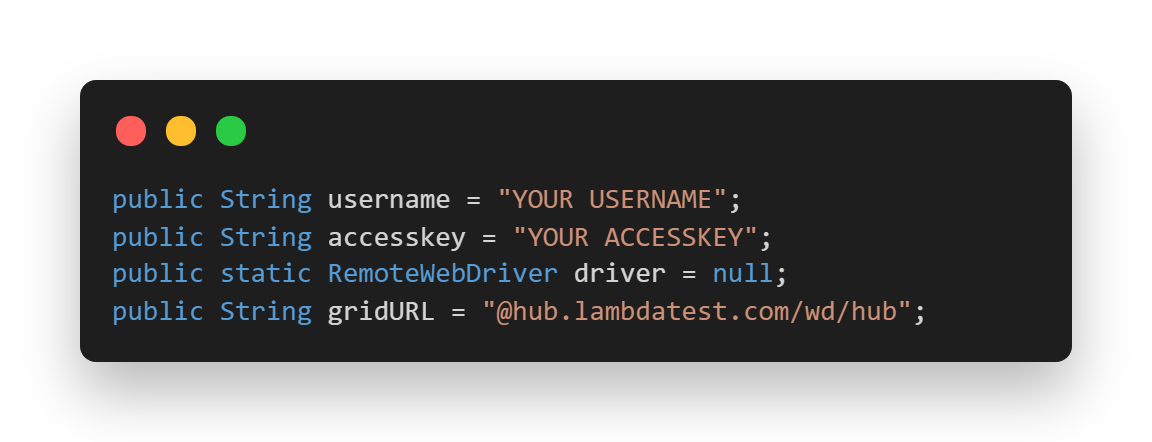
2. Global Variables: As we have used a Selenium Grid Cloud like LamdaTest to perform our test execution, we are using the below-shown variables.
Here, you can populate the values for your corresponding username and access key, which can be collected by logging into your LambdaTest Profile Section. You can copy the Username and the Access Token to be used in the code. However, the grid URL will remain the same, as shown below.
We have also used the Listener class here in order to customize the TestNG Report. TestNG provides us with a lot of TestNG Listeners (e.g. IAnnotationTransformer, IReporter, etc). These interfaces are used while performing Selenium cloud testing mainly to generate logs and customize the TestNG reports.
To implement the Listener class, you can simply add an annotation in your test class just above your class name.
Syntax:
[@Listeners](http://twitter.com/Listeners)(PackageName.ClassName.class)

3. @ BeforeTest(Setup Method): Here, we have used the LambdaTest Desired Capabilities Generator and have set the necessary capabilities of browser name, version, platform, etc., for our Selenium Remote WebDriver. After that, we are opening the website in the launched browser.
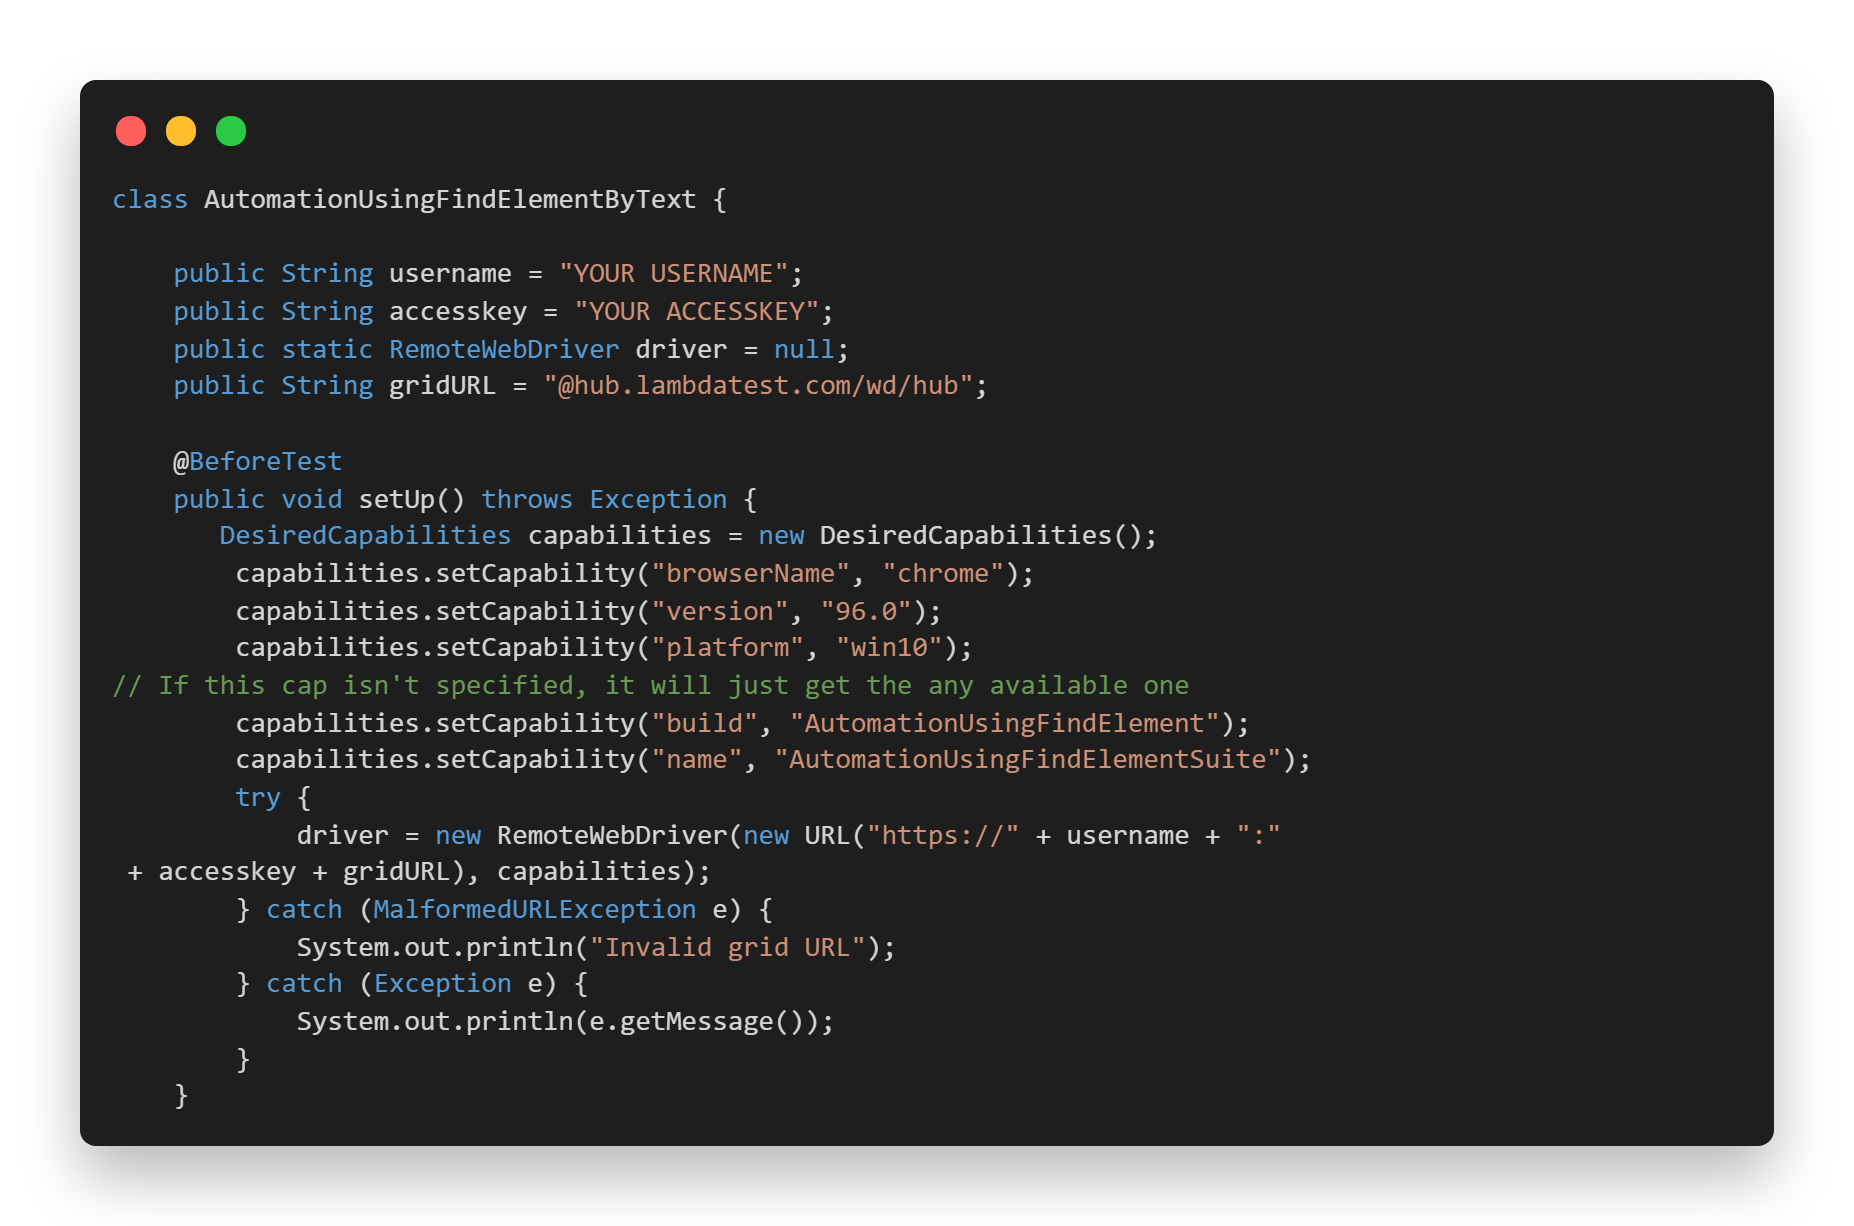
@ Test(findElementById): In this case, we first locate the web element for the checkbox using ID and then click on it. Later, we locate the success message and validate if it appears correctly after clicking on the checkbox.
@ AfterTest(closeBrowser): Here, we are just closing the launched browser.
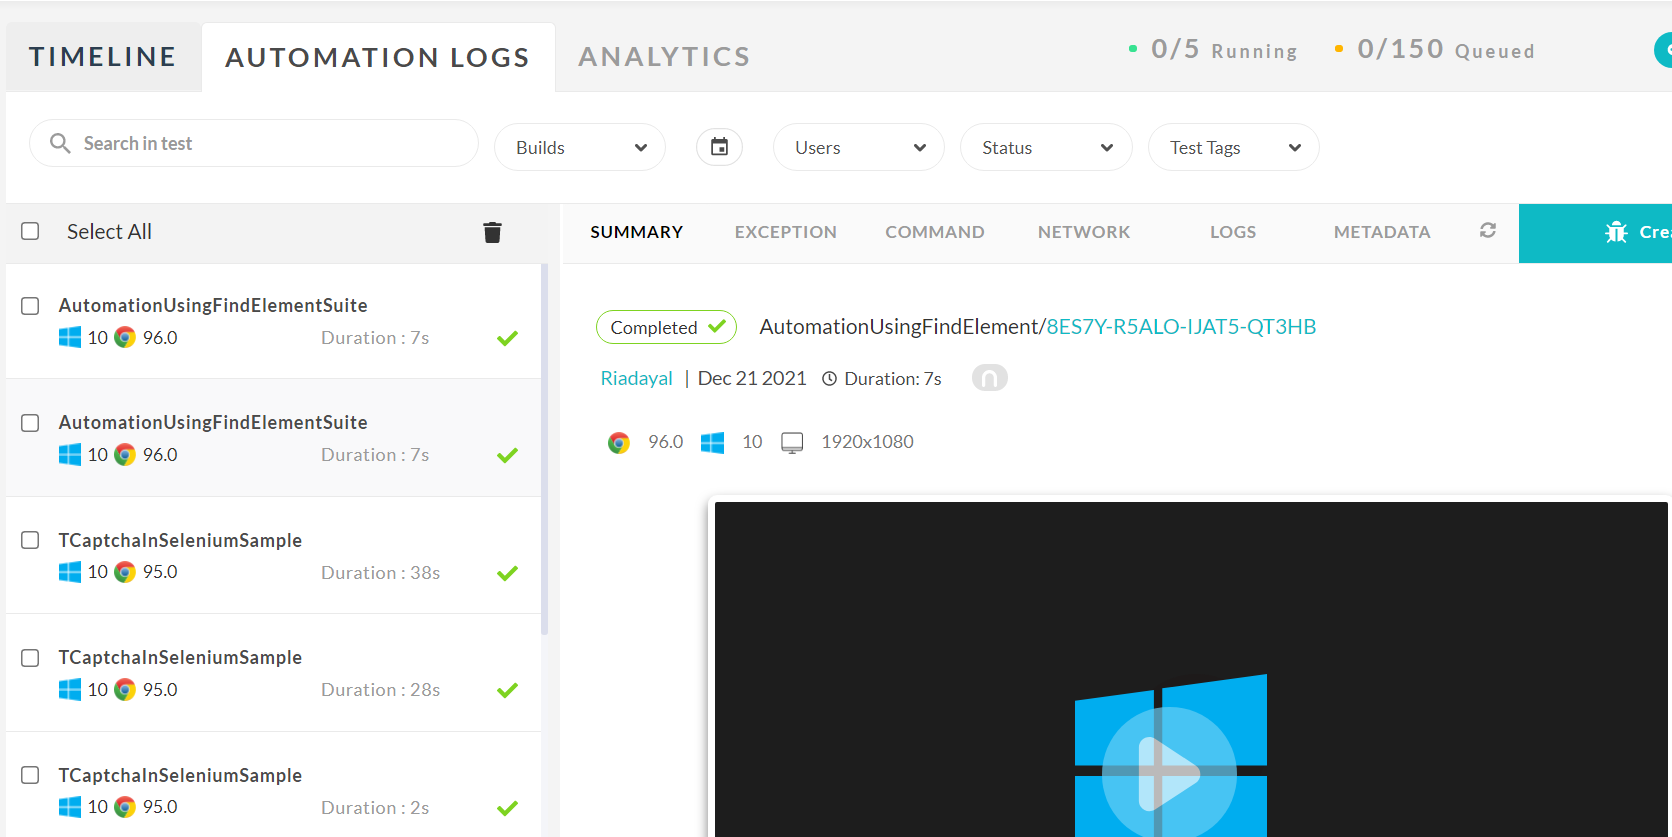
Once the tests are completed, you can also view your test results, logs, and the test recording as well in your LambdaTest Automation Dashboard.
Find Element by Name
Name locator in Selenium is similar to find by ID, except the driver will locate an element by the “name” attribute instead of “id”.
Syntax to find Element by Name:
WebElement elementName = driver.findElement(By.name(“name”));
Use Case:
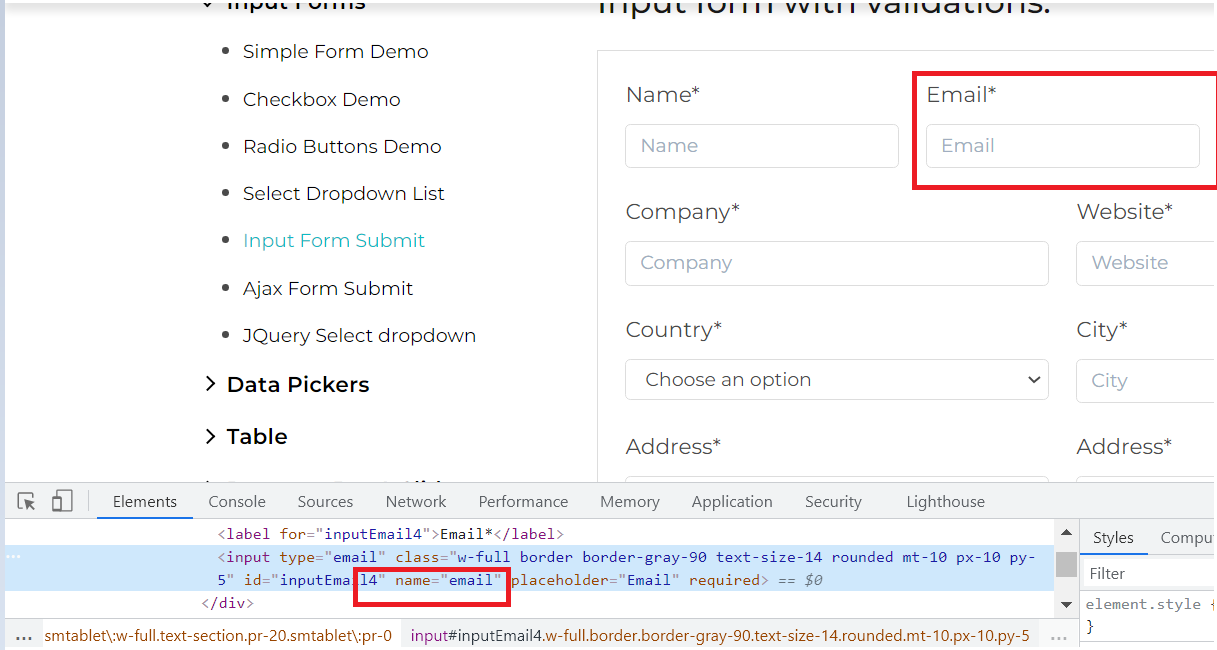
Let us see the input form page of Selenium Playground and write the locator for the input text boxes such as Name, Email, etc.
Locator:
The correct locator value making use of name in the above case would be:
WebElement emailTextBox= driver.findElement(By.name(“email”));
Implementation:
Now, let us automate entering the value of name and email making use of the findElement by Name.
package LambdaTest;

import io.github.bonigarcia.wdm.WebDriverManager;
import org.openqa.selenium.By;
import org.openqa.selenium.WebElement;
import org.openqa.selenium.chrome.ChromeDriver;
import org.openqa.selenium.remote.DesiredCapabilities;
import org.openqa.selenium.remote.RemoteWebDriver;
import org.testng.Assert;
import org.testng.annotations.AfterTest;
import org.testng.annotations.BeforeTest;
import org.testng.annotations.Listeners;
import org.testng.annotations.Test;
import org.openqa.selenium.support.ui.Select;
import java.net.MalformedURLException;
import java.net.URL;

@Listeners({util.Listener.class})
class AutomationUsingFindElement {

    public String username = "YOUR USERNAME";
    public String accesskey = "YOUR ACCESSKEY";
    public static RemoteWebDriver driver = null;
    public String gridURL = "@hub.lambdatest.com/wd/hub";

    @BeforeTest
    public void setUp() throws Exception {
        DesiredCapabilities capabilities = new DesiredCapabilities();
        capabilities.setCapability("browserName", "chrome");
        capabilities.setCapability("version", "96.0");
        capabilities.setCapability("platform", "win10"); // If this cap isn't specified, it will just get the any available one
        capabilities.setCapability("build", "AutomationUsingFindElement");
        capabilities.setCapability("name", "AutomationUsingFindElementSuite");
        try {
            driver = new RemoteWebDriver(new URL("https://" + username + ":" + accesskey + gridURL), capabilities);
        } catch (MalformedURLException e) {
            System.out.println("Invalid grid URL");
        } catch (Exception e) {
            System.out.println(e.getMessage());
        }
    }


    @Test
    public void findElementByName() {
        try {
            System.out.println("Logging into Lambda Test Input Form Demo Page");
            driver.get("https://www.lambdatest.com/selenium-playground/input-form-demo");

            WebElement nameTextBox = driver.findElement(By.name("name"));
            nameTextBox.sendKeys("LambdaTest");
            System.out.println("Entered Name");

            WebElement emailTextBox = driver.findElement(By.name("email"));
            emailTextBox.sendKeys("lambdatest@gmail.com");
            System.out.println("Entered Email");

        } catch (Exception e) {

        }

    }

    @AfterTest
    public void closeBrowser() {
        driver.close();
        System.out.println("The driver has been closed.");

    }

}
Code Walkthrough:
@ Test(findElementByName): In this case, we are first locating the web element for the Name text box and entering a value in the same. Later, we are locating the web element for the Email text box and the entering value in the email text box.
The remaining areas remain the same as we did in the Code Walkthrough of our first example.
Find Element by ClassName
The ClassName locator in Selenium finds the elements on the web page based on the CLASS attribute value. Here the value of the “class” attribute is passed as the locator.
Syntax to find Element by ClassName:
WebElement elementName = driver.findElement(By.classname(“className”));
Use Case:
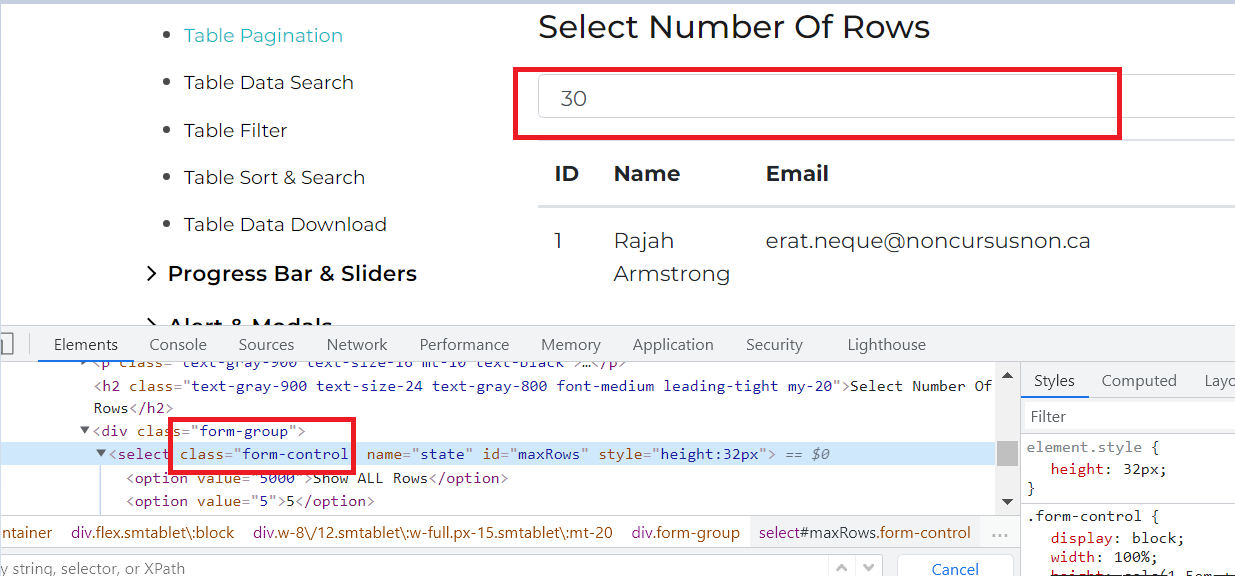
Let us see the table pagination demo page of Selenium Playground and write the locator for the dropdown to change the number of rows being displayed to 10.
Locator:
The correct locator value making use of ClassName in the above case would be:
WebElement selectDropdown=driver.findElement(By.className(“form-control”));
Implementation:
Below is the test class file that can be used for implementing the test case.
package LambdaTest;

import io.github.bonigarcia.wdm.WebDriverManager;
import org.openqa.selenium.By;
import org.openqa.selenium.WebElement;
import org.openqa.selenium.chrome.ChromeDriver;
import org.openqa.selenium.firefox.FirefoxProfile;
import org.openqa.selenium.remote.DesiredCapabilities;
import org.openqa.selenium.remote.RemoteWebDriver;
import org.openqa.selenium.support.ui.ExpectedConditions;
import org.openqa.selenium.support.ui.Select;
import org.openqa.selenium.support.ui.WebDriverWait;
import org.testng.Reporter;
import org.testng.annotations.AfterClass;
import org.testng.annotations.BeforeClass;
import org.testng.annotations.Test;

import java.net.MalformedURLException;
import java.net.URL;
import java.time.Duration;

public class automateCaptchaInSelenium {


    public String username = "YOUR USERNAME";
    public String accesskey = "YOUR ACCESSKEY";
    public static RemoteWebDriver driver = null;
    public String gridURL = "@hub.lambdatest.com/wd/hub";

    @BeforeClass
    public void setUp() throws Exception {
        DesiredCapabilities capabilities = new DesiredCapabilities();
        capabilities.setCapability("browserName", "chrome");
        capabilities.setCapability("version", "96.0");
        capabilities.setCapability("platform", "win10"); // If this cap isn't specified, it will just get the any available one
        capabilities.setCapability("build", "AutomationUsingFindElement");
        capabilities.setCapability("name", "AutomationUsingFindElementSuite");

        try {
            driver = new RemoteWebDriver(new URL("https://" + username + ":" + accesskey + gridURL), capabilities);
        } catch (MalformedURLException e) {
            System.out.println("Invalid grid URL");
        } catch (Exception e) {
            System.out.println(e.getMessage());
        }
        Reporter.log("Logging into Selenium Playground", true);

    }

    @Test
    public void findElementByClassName() {
        try {
            System.out.println("Logging into Lambda Test Table Pagination Demo Page");
            driver.get("https://www.lambdatest.com/selenium-playground/table-pagination-demo");

            WebElement selectDropdown=driver.findElement(By.className("form-control"));
            Select select = new Select(selectDropdown);
            select.selectByVisibleText("10");

            System.out.println("Changed the pagination dropdown to 10");
        } catch (Exception e) {

        }

    }


    @AfterClass
    public void closeBrowser() {
        driver.close();
        Reporter.log("Closing the browser", true);

    }

}
Code Walkthrough:
@ Test(findElementByClassName): In this case, we are first locating the web element for the dropdown using ClassName. Later, we are using Select Class for changing the dropdown value to 10 by using the selectByVisibleText option.

The remaining areas remain the same as we did in the Code Walkthrough of our first example.
Note: org.junit.runner.FilterFactory.FilterNotCreatedException
It happens when junit filters can’t be created
Find Element by TagName
A tagName is a part of a DOM structure where every element on a page is defined via tags like input tag, button tag or anchor tag, etc. Each tag has multiple attributes like ID, name, value class, etc. The TagName locator in Selenium finds the elements on the web page based on the element.
Syntax to find Element by TagName:
WebElement elementName = driver.findElement(By.tagName(“tagname”));
Use Case:
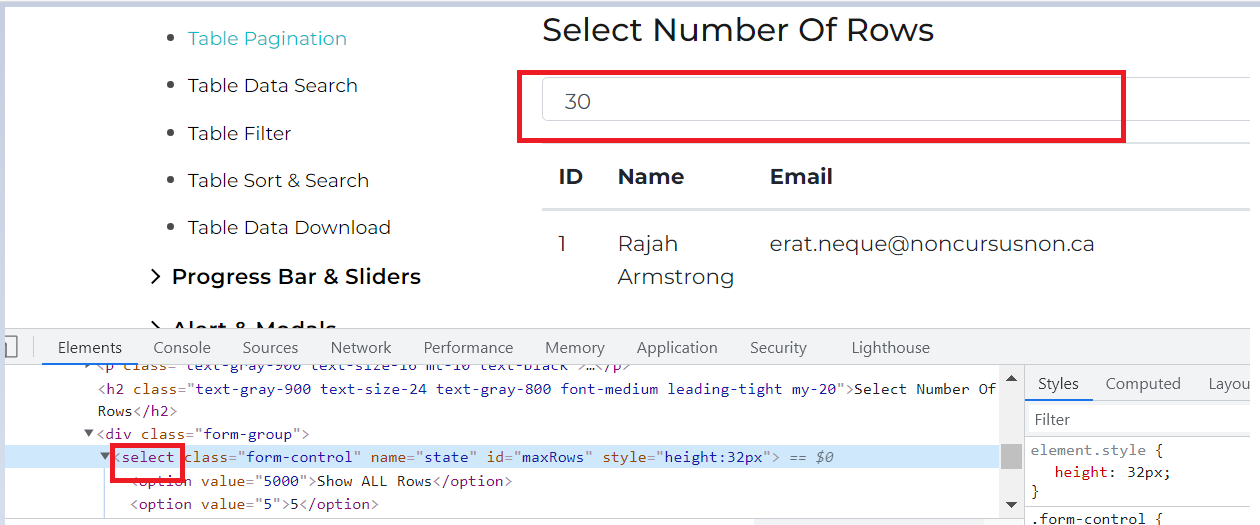
Let us see the same table pagination demo page of Selenium Playground and write the locator for the dropdown to change the number of rows displayed using the tag name.
Locator:
The correct locator value making use of tag name in the above case would be:
WebElement elementName = driver.findElement(By.tagName(“select”));
Implementation:
Below is the test class file that can be used for implementing the test case.
package LambdaTest;

import io.github.bonigarcia.wdm.WebDriverManager;
import org.openqa.selenium.By;
import org.openqa.selenium.WebElement;
import org.openqa.selenium.chrome.ChromeDriver;
import org.openqa.selenium.firefox.FirefoxProfile;
import org.openqa.selenium.remote.DesiredCapabilities;
import org.openqa.selenium.remote.RemoteWebDriver;
import org.openqa.selenium.support.ui.ExpectedConditions;
import org.openqa.selenium.support.ui.Select;
import org.openqa.selenium.support.ui.WebDriverWait;
import org.testng.Reporter;
import org.testng.annotations.AfterClass;
import org.testng.annotations.BeforeClass;
import org.testng.annotations.Test;

import java.net.MalformedURLException;
import java.net.URL;
import java.time.Duration;

public class automateCaptchaInSelenium {


    public String username = "YOUR USERNAME";
    public String accesskey = "YOUR ACCESSKEY";
    public static RemoteWebDriver driver = null;
    public String gridURL = "@hub.lambdatest.com/wd/hub";

    @BeforeClass
    public void setUp() throws Exception {
        DesiredCapabilities capabilities = new DesiredCapabilities();
        capabilities.setCapability("browserName", "chrome");
        capabilities.setCapability("version", "96.0");
        capabilities.setCapability("platform", "win10"); // If this cap isn't specified, it will just get the any available one
        capabilities.setCapability("build", "AutomationUsingFindElement");
        capabilities.setCapability("name", "AutomationUsingFindElementSuite");

        try {
            driver = new RemoteWebDriver(new URL("https://" + username + ":" + accesskey + gridURL), capabilities);
        } catch (MalformedURLException e) {
            System.out.println("Invalid grid URL");
        } catch (Exception e) {
            System.out.println(e.getMessage());
        }
        Reporter.log("Logging into Selenium Playground", true);

    }

    @Test
    public void findElementByTagName() {
        try {
            System.out.println("Logging into Lambda Test Table Pagination Demo Page");
            driver.get("https://www.lambdatest.com/selenium-playground/table-pagination-demo");

            WebElement selectDropdown=driver.findElement(By.tagName("select"));
            Select select = new Select(selectDropdown);
            select.selectByVisibleText("10");

            System.out.println("Changed the pagination dropdown to 10");
        } catch (Exception e) {

        }

    }


    @AfterClass
    public void closeBrowser() {
        driver.close();
        Reporter.log("Closing the browser", true);

    }

}
Code Walkthrough:
@ Test(findElementByTagName): In this case, we are first locating the web element for the dropdown using TagName. Later, we are using Select Class for changing the dropdown value to 10 by using the selectByVisibleText option.
The remaining areas remain the same as we did in the Code Walkthrough of our first example.
Find Element by Link Text
The Link Text locator in Selenium is used to identify the hyperlinks on a web page. It is determined with the help of an anchor tag. For creating the hyperlinks on a web page, we can use an anchor tag followed by the link Text.
Accessing links using their exact link text is done through the findElement by Link Text method. However, if two links have the exact link text, this method will only access the first one.
Syntax to find Element by Link Text:
WebElement elementName= driver.findElement(By.linkText(“link text”));
Use Case:
Let us see the radio button demo page of Selenium Playground and write the locator for the Selenium Playground hyperlink, which is used for navigation to the home page as highlighted below.
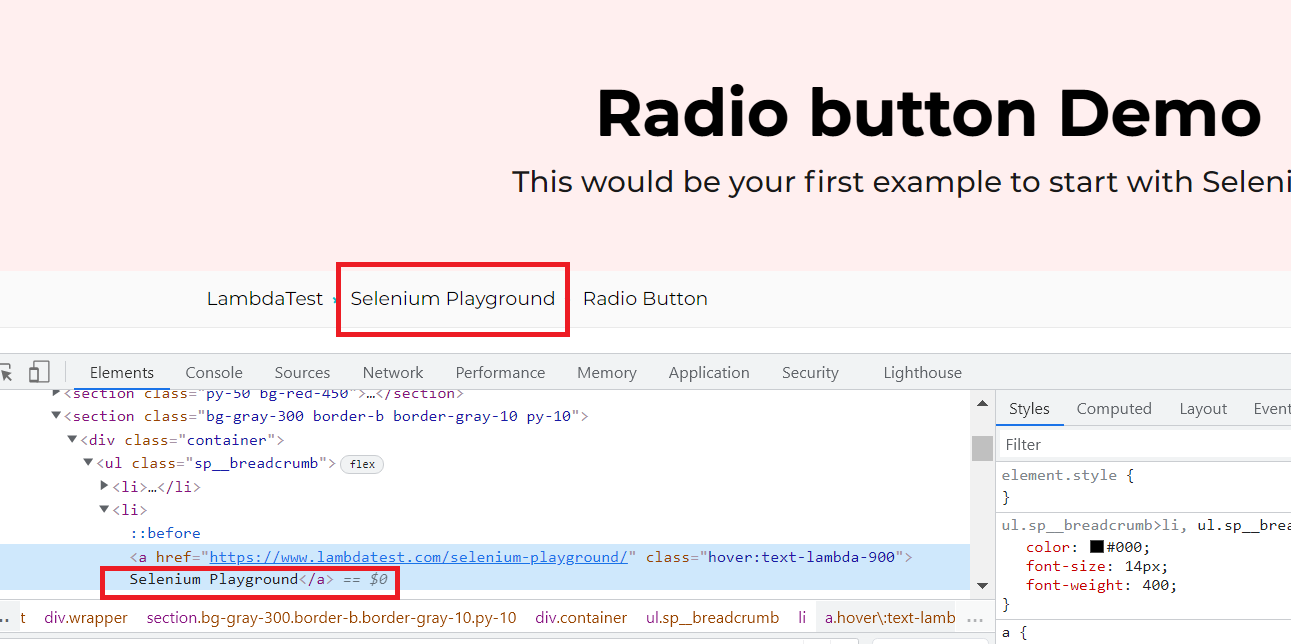
Locator:
The correct locator value making use of link text in the above case would be
WebElement seleniumPlaygroundLink= driver.findElement(By.linkText(“Selenium Playground”));
Implementation:
Below is the test class file which can be used for implementing the case.
package LambdaTest;

import io.github.bonigarcia.wdm.WebDriverManager;
import org.openqa.selenium.By;
import org.openqa.selenium.WebElement;
import org.openqa.selenium.chrome.ChromeDriver;
import org.openqa.selenium.remote.DesiredCapabilities;
import org.openqa.selenium.remote.RemoteWebDriver;
import org.testng.Assert;
import org.testng.annotations.AfterTest;
import org.testng.annotations.BeforeTest;
import org.testng.annotations.Listeners;
import org.testng.annotations.Test;
import org.openqa.selenium.support.ui.Select;
import java.net.MalformedURLException;
import java.net.URL;

@Listeners({util.Listener.class})
class AutomationUsingFindElement {

    public String username = "YOUR USERNAME";
    public String accesskey = "YOUR ACCESSKEY";
    public static RemoteWebDriver driver = null;
    public String gridURL = "@hub.lambdatest.com/wd/hub";

    @BeforeTest
    public void setUp() throws Exception {
        DesiredCapabilities capabilities = new DesiredCapabilities();
        capabilities.setCapability("browserName", "chrome");
        capabilities.setCapability("version", "96.0");
        capabilities.setCapability("platform", "win10"); // If this cap isn't specified, it will just get the any available one
        capabilities.setCapability("build", "AutomationUsingFindElement");
        capabilities.setCapability("name", "AutomationUsingFindElementSuite");
        try {
            driver = new RemoteWebDriver(new URL("https://" + username + ":" + accesskey + gridURL), capabilities);
        } catch (MalformedURLException e) {
            System.out.println("Invalid grid URL");
        } catch (Exception e) {
            System.out.println(e.getMessage());
        }

    }

    @Test
    public void findElementByLinkText() {
        try {
            System.out.println("Logging into Lambda Test Radio Button Demo Page");
            driver.get("https://www.lambdatest.com/selenium-playground/radiobutton-demo");

            WebElement seleniumPlaygroundLink= driver.findElement(By.linkText("Selenium Playground"));
            seleniumPlaygroundLink.click();
            System.out.println("Clicked on the Selenium Playground Navigation Link");


        } catch (Exception e) {

        }

    }


    @AfterTest
    public void closeBrowser() {
        driver.close();
        System.out.println("The driver has been closed.");

    }

}
Code Walkthrough:
@ Test(findElementByLinkText): In this case, we are first locating the web element for the navigation link to the main Selenium Playground page using Link Text and later, click on the same.
The remaining areas remain the same as we did in the Code Walkthrough of our first example.
Find Element by Partial Link Text
Accessing links using a portion of their link text is done using the By.partialLinkText() method. If you specify a partial link text that has multiple matches, only the first match will be accessed.
Syntax to find Element by Partial Link Test:
WebElement elementName= driver.findElement(By.partialLinkText(“partial link text”));
Use Case:
Let us see the same radio button demo page of Selenium Playground and write the locator for the Selenium Playground hyperlink, which is used for navigating to the home page as highlighted below. However, this time we will make use of the partial link text.

Locator:
The correct locator value making use of link text in the above case would be:
WebElement seleniumPlaygroundLink= driver.findElement(By.partialLinkText(“Playground”));
Implementation:
Below is the test class file which can be used for implementing the case.
package LambdaTest;

import io.github.bonigarcia.wdm.WebDriverManager;
import org.openqa.selenium.By;
import org.openqa.selenium.WebElement;
import org.openqa.selenium.chrome.ChromeDriver;
import org.openqa.selenium.remote.DesiredCapabilities;
import org.openqa.selenium.remote.RemoteWebDriver;
import org.testng.Assert;
import org.testng.annotations.AfterTest;
import org.testng.annotations.BeforeTest;
import org.testng.annotations.Listeners;
import org.testng.annotations.Test;
import org.openqa.selenium.support.ui.Select;
import java.net.MalformedURLException;
import java.net.URL;

@Listeners({util.Listener.class})
class AutomationUsingFindElement {

    public String username = "YOUR USERNAME";
    public String accesskey = "YOUR ACCESSKEY";
    public static RemoteWebDriver driver = null;
    public String gridURL = "@hub.lambdatest.com/wd/hub";

    @BeforeTest
    public void setUp() throws Exception {
        DesiredCapabilities capabilities = new DesiredCapabilities();
        capabilities.setCapability("browserName", "chrome");
        capabilities.setCapability("version", "96.0");
        capabilities.setCapability("platform", "win10"); // If this cap isn't specified, it will just get the any available one
        capabilities.setCapability("build", "AutomationUsingFindElement");
        capabilities.setCapability("name", "AutomationUsingFindElementSuite");
        try {
            driver = new RemoteWebDriver(new URL("https://" + username + ":" + accesskey + gridURL), capabilities);
        } catch (MalformedURLException e) {
            System.out.println("Invalid grid URL");
        } catch (Exception e) {
            System.out.println(e.getMessage());
        }
    }


    @Test
    public void findElementByPartialLinkText() {
        try {
            System.out.println("Logging into Lambda Test Radio Button Demo Page");
            driver.get("https://www.lambdatest.com/selenium-playground/radiobutton-demo");

            WebElement seleniumPlaygroundLink= driver.findElement(By.partialLinkText("Playground"));
            seleniumPlaygroundLink.click();
            System.out.println("Clicked on the Selenium Playground Navigation Link");
        } catch (Exception e) {

        }

    }

    @AfterTest
    public void closeBrowser() {
        driver.close();
        System.out.println("The driver has been closed.");

    }

}
Code Walkthrough:
@ Test(findElementByPartialLinkText): In this case, we are first locating the web element for the navigation link to the main Selenium Playground page using Partial Link Text and later, click on the same.
The remaining areas remain the same as we did in the Code Walkthrough of our first example.
Find Element by CSS Selector
CSS Selectors are one of the locator strategies used in Selenium to identify the web elements. The CSS Selectors locator in Selenium mainly uses the character sequence pattern, which identifies the web elements based on their HTML structure. Locating an element using a CSS selector in Selenium may seem a little more difficult than using attributes like id, name, link, etc. Still, it’s one of the most efficient strategies to locate dynamic elements that don’t have consistent HTML attributes. CSS Selector syntax is quite similar to the XPath syntax. It can be represented as follows.
Node[attribute name=”attribute value”]
Let us now see the syntax of using a CSS selector with the findElement in Selenium.
Syntax to find Element by CSS Selector:
WebElement elementName= driver.findElement(By.cssSelector(“css selector”));
Use Case:
Let us see the single checkbox demo page of Selenium Playground and write the CSS selector for the checkbox, and later use the same in locating the web element using findElement.
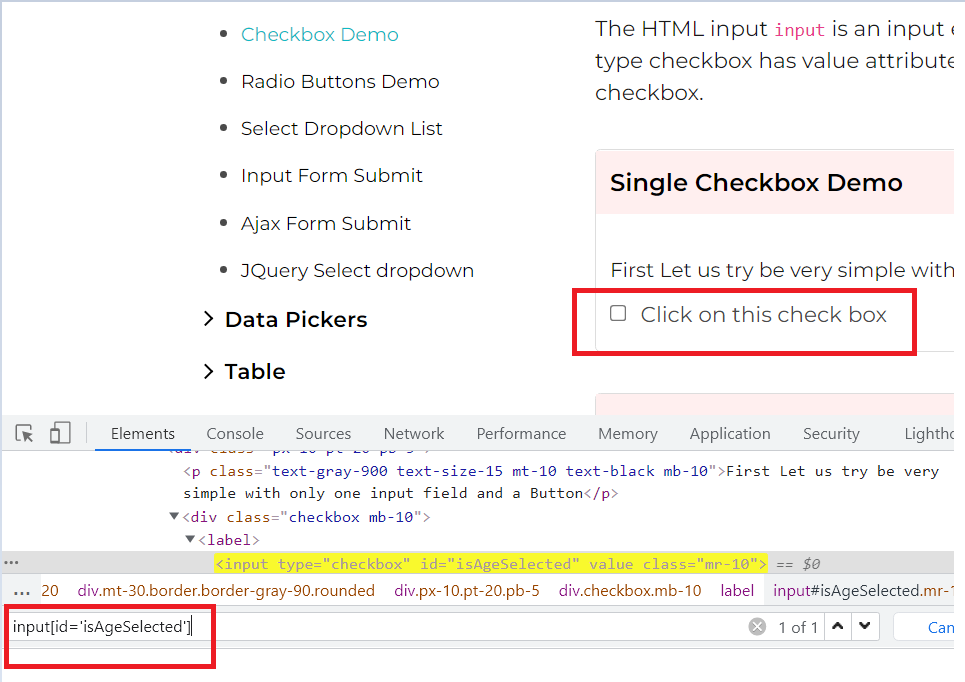
Locator:
The correct locator value making use of CSS selector in the above case would be:
WebElement checkbox= driver.findElement(By.cssSelector(“input[id='isAgeSelected']”));
Implementation:
Below is the test class file which can be used for implementing the case.
package LambdaTest;

import io.github.bonigarcia.wdm.WebDriverManager;
import org.openqa.selenium.By;
import org.openqa.selenium.WebElement;
import org.openqa.selenium.chrome.ChromeDriver;
import org.openqa.selenium.remote.DesiredCapabilities;
import org.openqa.selenium.remote.RemoteWebDriver;
import org.testng.Assert;
import org.testng.annotations.AfterTest;
import org.testng.annotations.BeforeTest;
import org.testng.annotations.Listeners;
import org.testng.annotations.Test;
import org.openqa.selenium.support.ui.Select;
import java.net.MalformedURLException;
import java.net.URL;

@Listeners({util.Listener.class})
class AutomationUsingFindElement {

    public String username = "YOUR USERNAME";
    public String accesskey = "YOUR ACCESSKEY";
    public static RemoteWebDriver driver = null;
    public String gridURL = "@hub.lambdatest.com/wd/hub";

    @BeforeTest
    public void setUp() throws Exception {
        DesiredCapabilities capabilities = new DesiredCapabilities();
        capabilities.setCapability("browserName", "chrome");
        capabilities.setCapability("version", "96.0");
        capabilities.setCapability("platform", "win10"); // If this cap isn't specified, it will just get the any available one
        capabilities.setCapability("build", "AutomationUsingFindElement");
        capabilities.setCapability("name", "AutomationUsingFindElementSuite");
        try {
            driver = new RemoteWebDriver(new URL("https://" + username + ":" + accesskey + gridURL), capabilities);
        } catch (MalformedURLException e) {
            System.out.println("Invalid grid URL");
        } catch (Exception e) {
            System.out.println(e.getMessage());
        }
    }


    @Test
    public void findElementByCSSSelector() {
        try {
            System.out.println("Logging into Lambda Test Checkbox Demo Page");
            driver.get("https://www.lambdatest.com/selenium-playground/checkbox-demo");

            WebElement checkbox= driver.findElement(By.cssSelector("input[id='isAgeSelected']"));
            checkbox.click();
            System.out.println("Clicked on the Single Checkbox button");

            WebElement successMessage=driver.findElement(By.id("txtAge"));
            String expectedMessage=successMessage.getText();

            Assert.assertEquals("Success - Check box is checked", expectedMessage);
        } catch (Exception e) {

        }

    }


    @AfterTest
    public void closeBrowser() {
        driver.close();
        System.out.println("The driver has been closed.");

    }

}
Code Walkthrough:
@ Test(findElementByCSSSelector): In this case, we are first locating the web element for the checkbox using CSS selector and then clicking on it. Later, we locate the success message and validate if it appears correctly after clicking on the checkbox.
The remaining areas remain the same as we did in the Code Walkthrough of our first example.
Find Element by XPath
Also known as XML Path, the XPath locator in Selenium is one of the most commonly used locators in Selenium WebDriver that can help you navigate through the HTML structure of a page.
The basic format of XPath in Selenium is explained below.
XPath = //tagname[[@Attribute](http://twitter.com/Attribute)=’Value’]
Let us now see the syntax of using XPaths with find elements in Selenium.
Syntax to find Elements by XPath:
WebElement elementName= driver.findElement(By.xpath(“xpath”));
Use Case to find Element by XPath:
Let us see the same example as we saw in the CSS selector, single checkbox demo page of Selenium Playground, and write the XPath for the checkbox.
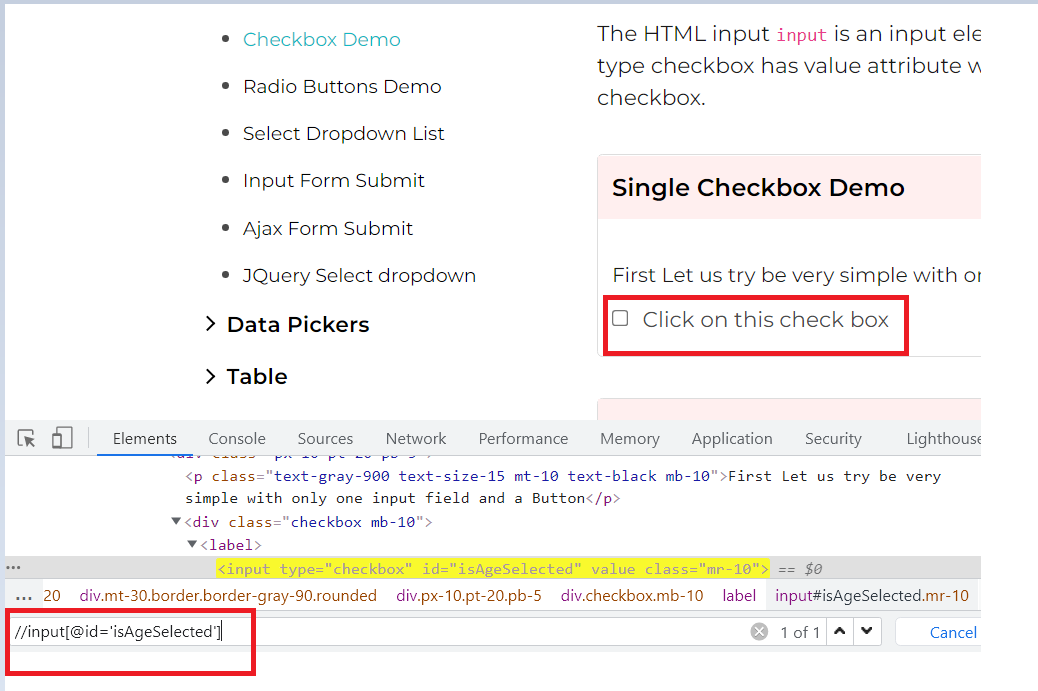
Locator:
The correct locator value making use of XPath in the above case would be
WebElement checkbox= driver.findElement(By.xpath(“//input[[@id](http://twitter.com/id)='isAgeSelected']”));
Implementation:
Below is the test class file which can be used for implementing the case.
package LambdaTest;

    import io.github.bonigarcia.wdm.WebDriverManager;
    import org.openqa.selenium.By;
    import org.openqa.selenium.WebElement;
    import org.openqa.selenium.chrome.ChromeDriver;
    import org.openqa.selenium.remote.DesiredCapabilities;
    import org.openqa.selenium.remote.RemoteWebDriver;
    import org.testng.Assert;
    import org.testng.annotations.AfterTest;
    import org.testng.annotations.BeforeTest;
    import org.testng.annotations.Listeners;
    import org.testng.annotations.Test;
    import org.openqa.selenium.support.ui.Select;
    import java.net.MalformedURLException;
    import java.net.URL;

    @Listeners({util.Listener.class})
    class AutomationUsingFindElement {

        public String username = "YOUR USERNAME";
        public String accesskey = "YOUR ACCESSKEY";
        public static RemoteWebDriver driver = null;
        public String gridURL = "@hub.lambdatest.com/wd/hub";

        @BeforeTest
        public void setUp() throws Exception {
            DesiredCapabilities capabilities = new DesiredCapabilities();
            capabilities.setCapability("browserName", "chrome");
            capabilities.setCapability("version", "96.0");
            capabilities.setCapability("platform", "win10"); // If this cap isn't specified, it will just get the any available one
            capabilities.setCapability("build", "AutomationUsingFindElement");
            capabilities.setCapability("name", "AutomationUsingFindElementSuite");
            try {
                driver = new RemoteWebDriver(new URL("https://" + username + ":" + accesskey + gridURL), capabilities);
            } catch (MalformedURLException e) {
                System.out.println("Invalid grid URL");
            } catch (Exception e) {
                System.out.println(e.getMessage());
            }
        }


        @Test
        public void findElementByXPath() {
            try {
                System.out.println("Logging into Lambda Test Checkbox Demo Page");
                driver.get("https://www.lambdatest.com/selenium-playground/checkbox-demo");

                WebElement checkbox= driver.findElement(By.xpath("//input[@id='isAgeSelected']"));
                checkbox.click();
                System.out.println("Clicked on the Single Checkbox button");

                WebElement successMessage=driver.findElement(By.id("txtAge"));
                String expectedMessage=successMessage.getText();

                Assert.assertEquals("Success - Check box is checked", expectedMessage);
            } catch (Exception e) {

            }

        }

        @AfterTest
        public void closeBrowser() {
            driver.close();
            System.out.println("The driver has been closed.");

        }

    }
Code Walkthrough:
@ Test(findElementByCSSSelector): In this case, we are first locating the web element for the checkbox using XPath and then clicking on it. Later, we locate the success message and validate if it appears correctly after clicking on the checkbox.
The remaining areas remain the same as we did in the Code Walkthrough of our first example.
Use Case to find Elements by XPath:
Let us see an implementation using findElements as well.
Log in to Selenium Playground and list down all the section headers on the page.
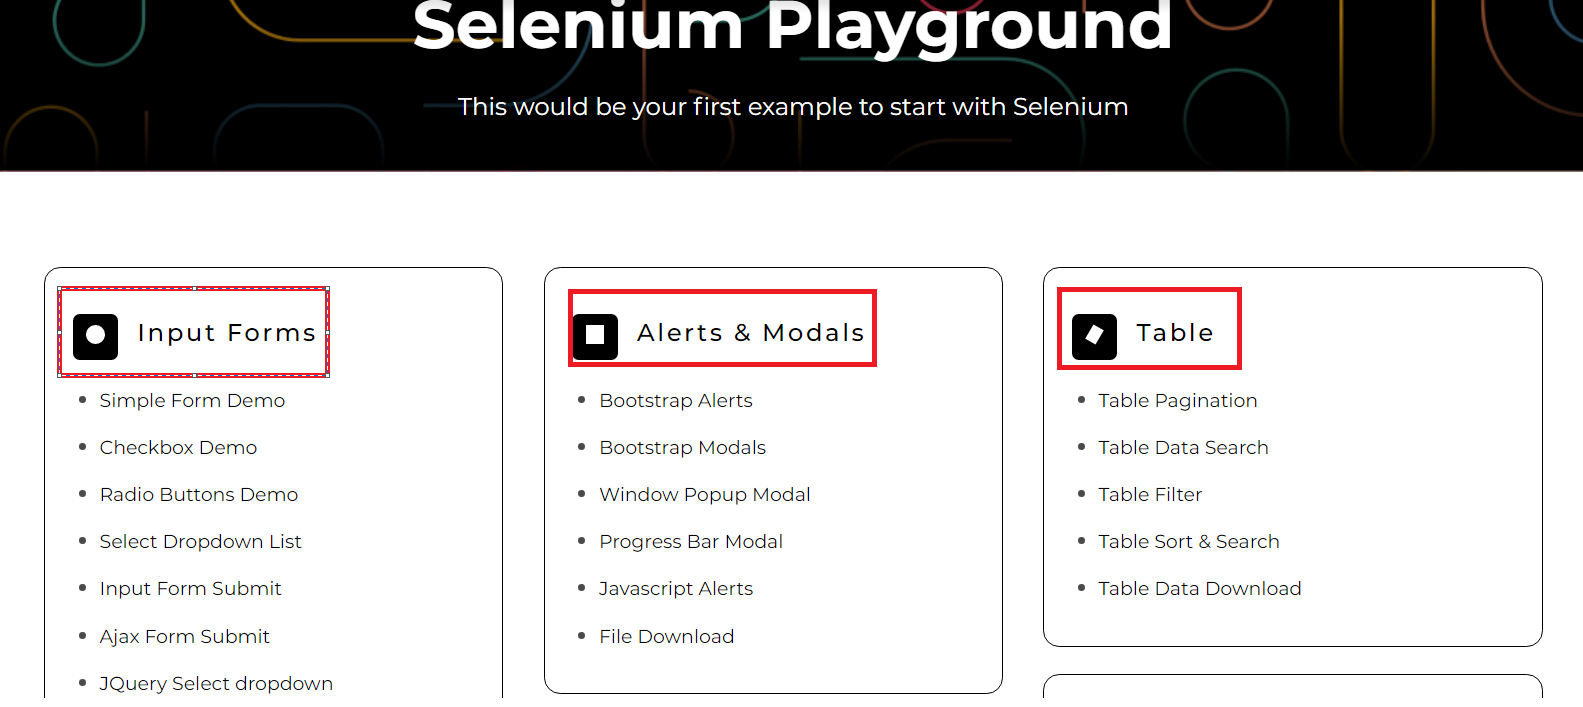
Locator:
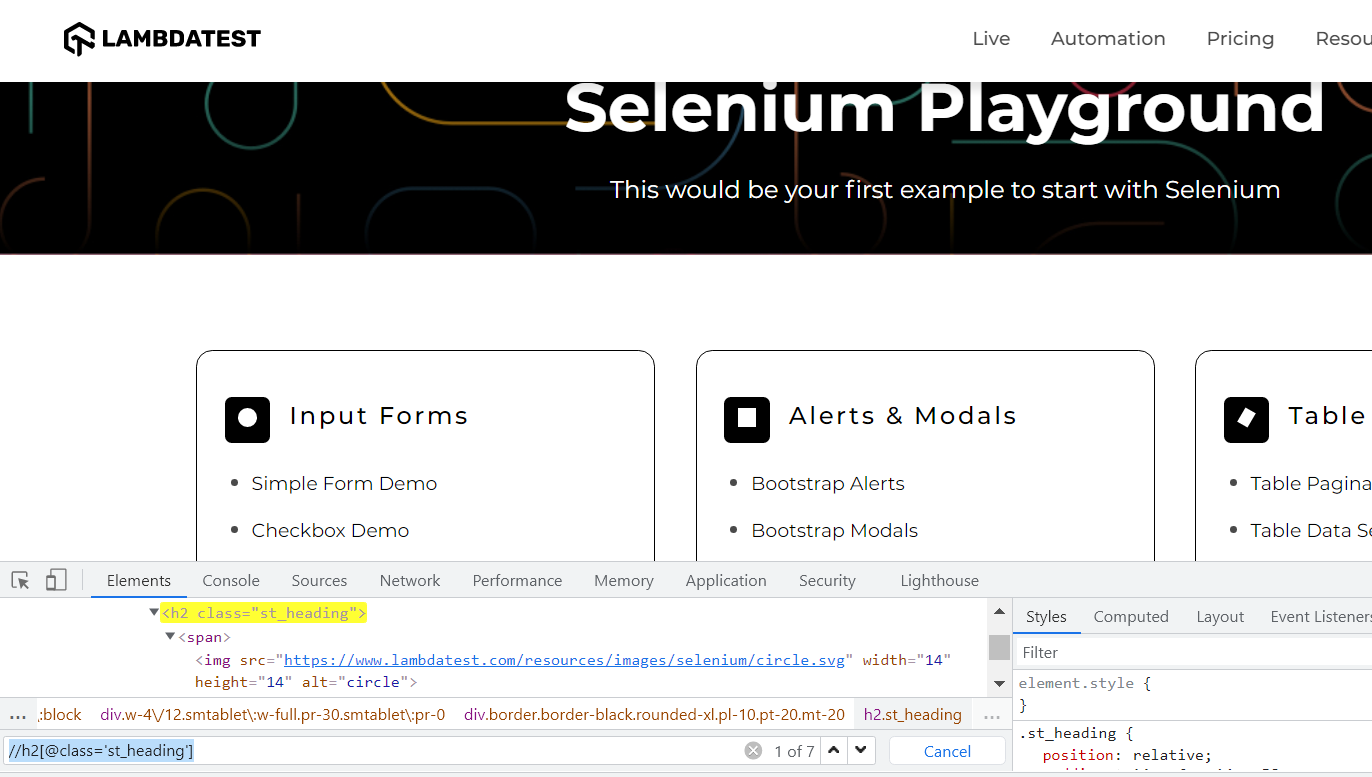
When we inspect the section headers using XPath, we see that multiple elements are being returned making use of the same XPath. Hence, in such cases, it would be appropriate to use findElements.
List<WebElement> sectionHeaders= driver.findElements(By.xpath(“//h2[[@class](http://twitter.com/class)='st_heading']”));
Implementation:
Below is the test class file which can be used for implementing the case.
package LambdaTest;

    import io.github.bonigarcia.wdm.WebDriverManager;
    import org.openqa.selenium.By;
    import org.openqa.selenium.WebElement;
    import org.openqa.selenium.chrome.ChromeDriver;
    import org.openqa.selenium.remote.DesiredCapabilities;
    import org.openqa.selenium.remote.RemoteWebDriver;
    import org.testng.Assert;
    import org.testng.annotations.AfterTest;
    import org.testng.annotations.BeforeTest;
    import org.testng.annotations.Listeners;
    import org.testng.annotations.Test;
    import java.net.MalformedURLException;
    import java.net.URL;
    import java.util.List;

    @Listeners({util.Listener.class})
    class AutomationUsingFindElement {

        public String username = "YOUR USERNAME";
        public String accesskey = "YOUR ACCESSKEY";
        public static RemoteWebDriver driver = null;
        public String gridURL = "@hub.lambdatest.com/wd/hub";

        @BeforeTest
        public void setUp() throws Exception {
            DesiredCapabilities capabilities = new DesiredCapabilities();
            capabilities.setCapability("browserName", "chrome");
            capabilities.setCapability("version", "96.0");
            capabilities.setCapability("platform", "win10"); // If this cap isn't specified, it will just get the any available one
            capabilities.setCapability("build", "AutomationUsingFindElement");
            capabilities.setCapability("name", "AutomationUsingFindElementSuite");
            try {
                driver = new RemoteWebDriver(new URL("https://" + username + ":" + accesskey + gridURL), capabilities);
            } catch (MalformedURLException e) {
                System.out.println("Invalid grid URL");
            } catch (Exception e) {
                System.out.println(e.getMessage());
            }
        }

        @Test
        public void findElementsByXPath() {
            try {
                System.out.println("Logging into Lambda Test Selenium Playground Page");
                driver.get("https://www.lambdatest.com/selenium-playground/");

                List<WebElement> sectionHeaders= driver.findElements(By.xpath("//h2[@class='st_heading']"));
                for(WebElement e: sectionHeaders){
                    System.out.println("The list of headers are:"+e.getText());
                }
            } catch (Exception e) {

            }

        }

        @AfterTest
        public void closeBrowser() {
            driver.close();
            System.out.println("The driver has been closed.");

        }

    }
Code Walkthrough:
@ Test(findElementsByXPath): In this case, we are locating the section headers using XPath and storing them in a list of web elements. Later, we iterated through the list and printed their text.
The remaining areas remain the same as we did in the Code Walkthrough of our first example.
List<WebElement> sectionHeaders= driver.findElements(By.xpath("//h2[[@class](http://twitter.com/class)='st_heading']"));
                for(WebElement e: sectionHeaders){
                    System.out.println("The list of headers are:"+e.getText());
Console Output:
Once you run the above test case, your console output would look something like below.
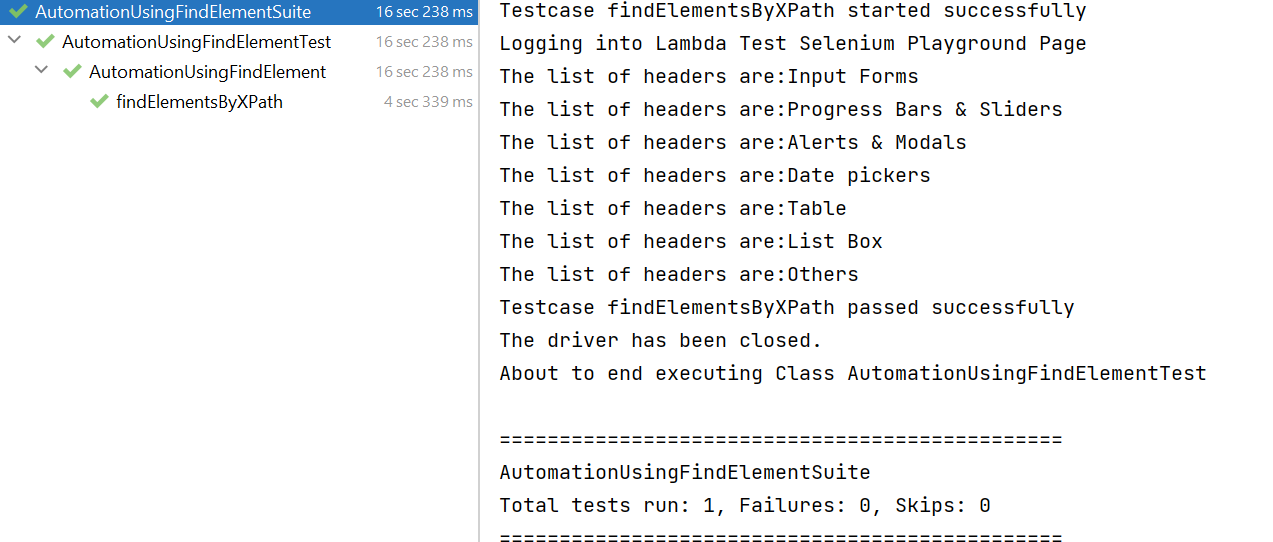
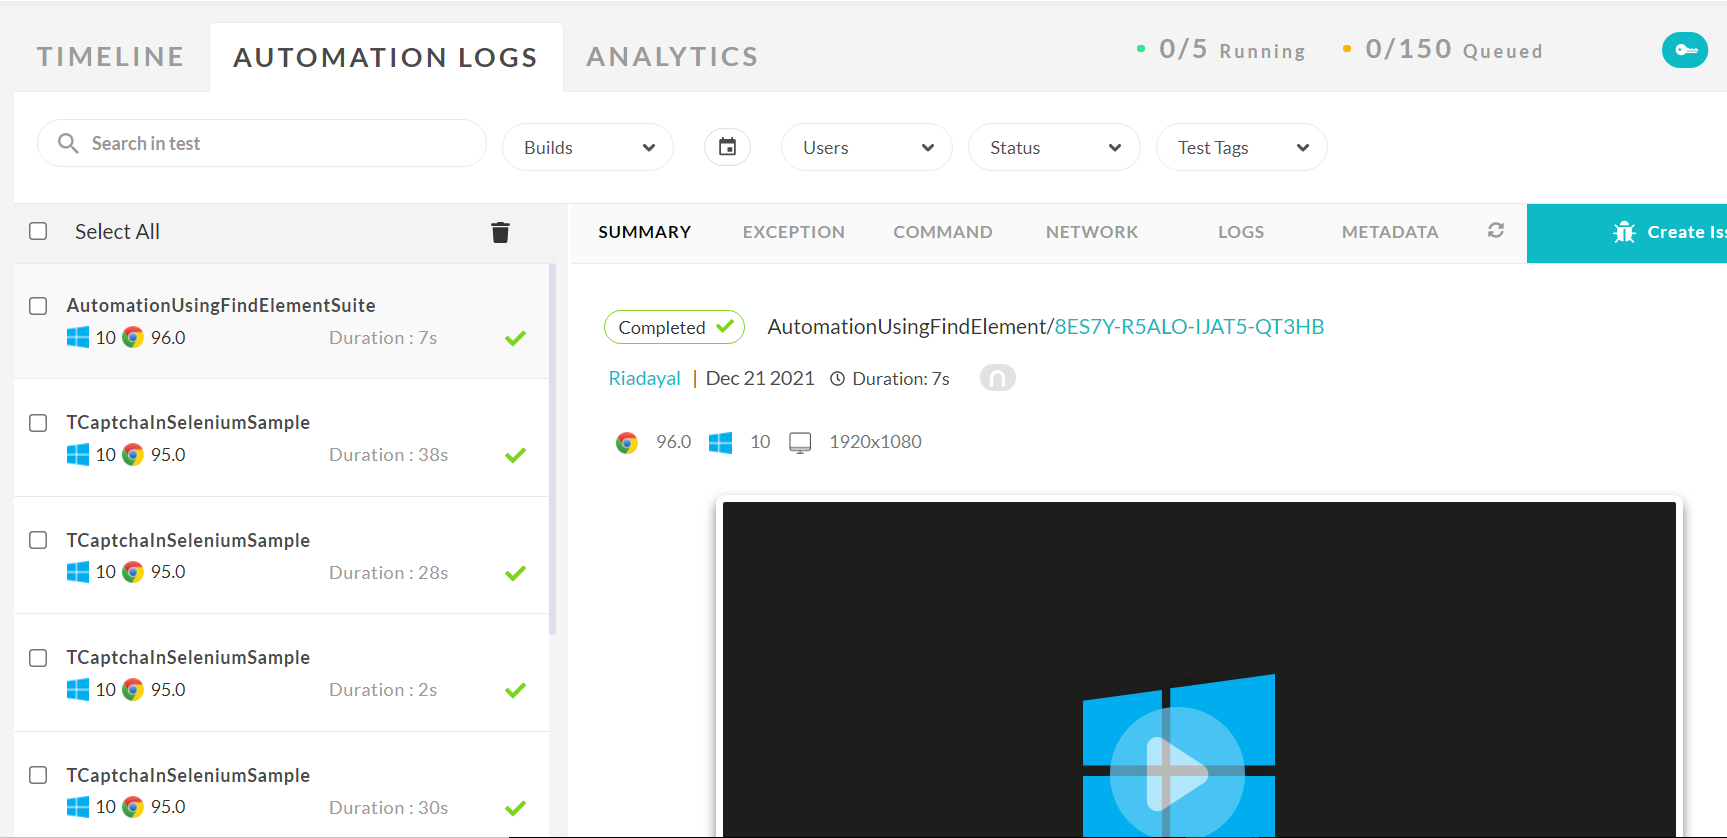
Once the tests are completed, you can also view your test results, logs, and the test recording as well in your LambdaTest Automation Dashboard.
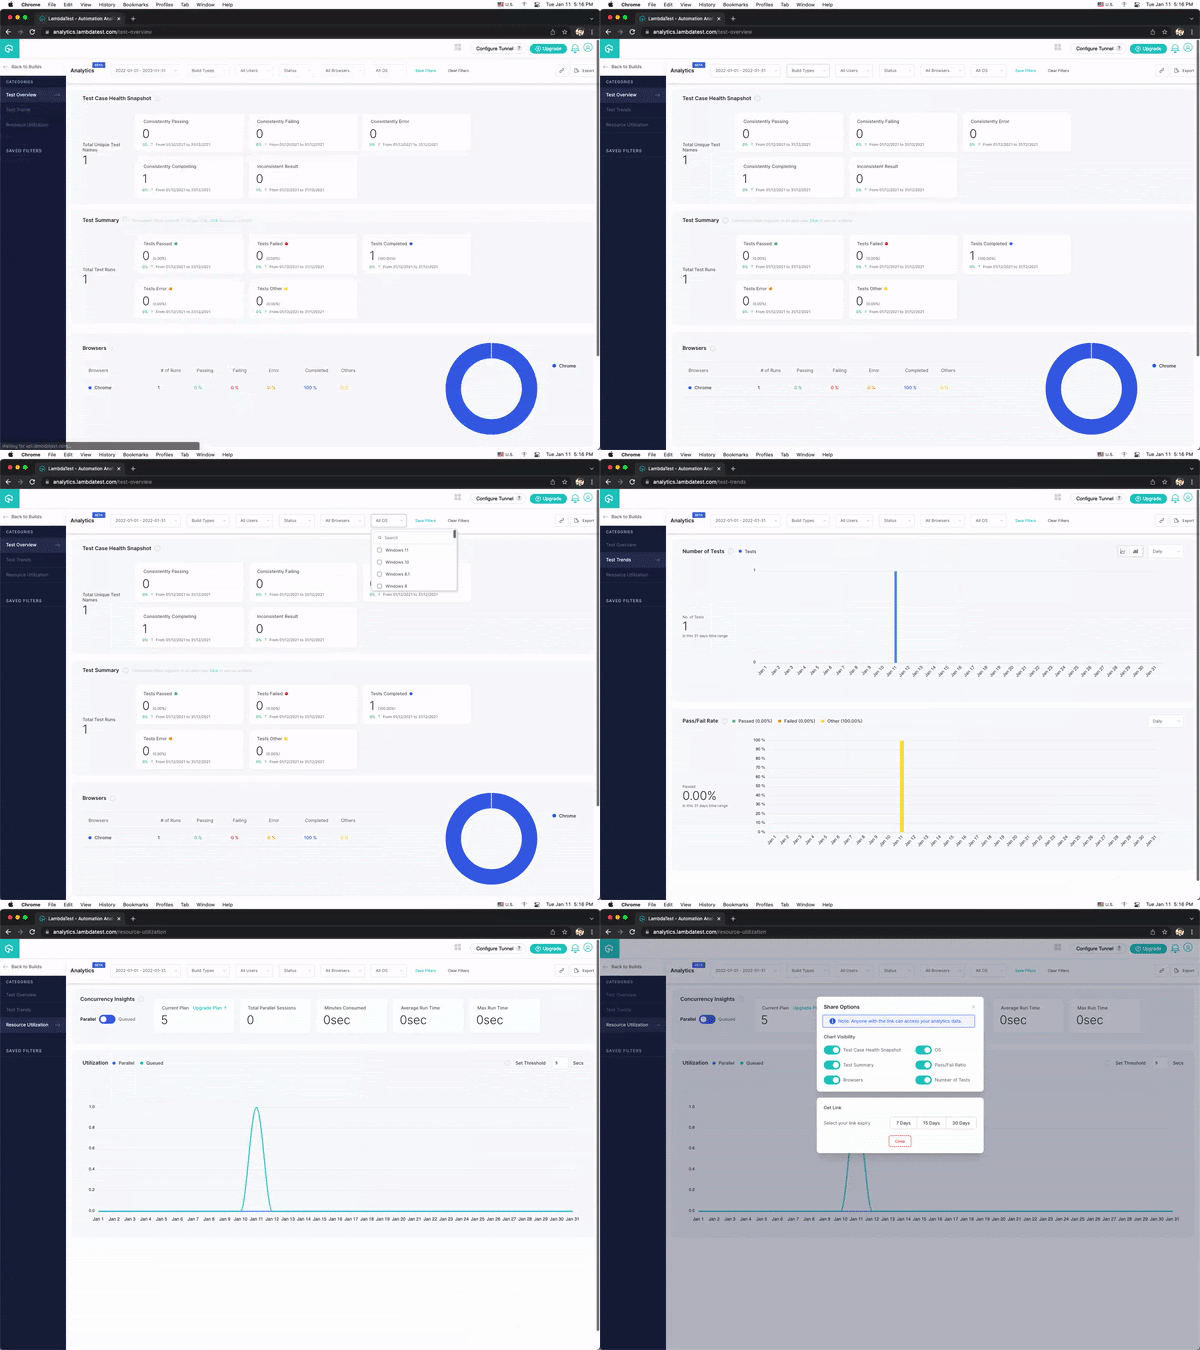
Upon completion of the test, test results will be displayed on the LambdaTest Analytics Dashboard. The dashboard shows all the details and metrics related to your tests.
Navigate to the LambdaTest Analytics Dashboard to view the metrics of your tests. The Test Overview will allow you to quickly assess test performance and overall health. Meanwhile, the Test Summary will show how many passes and fails your team has run and the overall efficacy of these tests.
If you’re a developer who’s looking to take your development and test engineering skills to the next level, this Selenium 101 certification from LambdaTest can help you reach that goal.
Here’s a short glimpse of the Selenium 101 certification from LambdaTest:
Conclusion
In this article on the difference between findElement and findElements in Selenium, we learned about what is findElement and findElements in Selenium Java and had a glance at their major differences. We also saw the various implementations of findElement using ID, Name, ClassName, TagName, etc. In the end, we also implemented a use case using findElements.
Hope you enjoyed reading this article and learned something new about Find Element.
Happy Testing!!
![FindElement And FindElements In Selenium [Differences]](https://cdn.hashnode.com/res/hashnode/image/upload/v1649337848892/HnpgHrasW.jpg?w=1600&h=840&fit=crop&crop=entropy&auto=compress,format&format=webp)